Users with UIDs < 1000 : workarounds and how RHEL 7.2 breaks some of these hacks

When RHEL/CentOS 7.2 was released there was a change in PAM configs which authconfig generates.
For most people this won’t have made any difference, but if you occasionally use entries in /etc/passwd to override user information from other sources (e.g. NIS, LDAP) then this can bite you.

The RHEL bug here shows the difference and discussion around it, which can be summarised in the following small change.

In CentOS 7.1 you see this line in the PAM configs:

auth sufficient pam_unix.so nullok try_first_pass

…whilst in 7.2 it changes to this:

auth [success=done ignore=ignore default=die] pam_unix.so nullok try_first_pass

The difference here is that the `pam_unix` entry essentially changes from (in PAM terms) “sufficient” to “required”, and any failure there means that authentication is denied.

“Well, my users are in LDAP so this won’t affect me!”

Probably, but if you happen to add an entry to /etc/passwd to override something for a user, such as their shell, home directory or (in this case) their UID (yes, hacky I know, but old NIS habits die hard…):

testuser:*:12345:12345:Test User:/home/testuser:/bin/bash

..then this means that your user is defined as being a target for the pam_unix module (since it’s a local user defined in the local passwd file), and from 7.2 you hit that modified pam_unix line and get auth failures. In 7.1 you’d get entries in the logs saying that pam_unix denied access but it would continue on through the subsequent possibilities (pam_ldap, pam_sss or whatever else you have in there) and check the password against those.

The bug referenced above suggests a workaround of using authconfig --enablenis, as this happens to set the pam_unix line back to the old version, but that has a bunch of other unwanted effects (like enabling NIS in /etc/nsswitch.conf).

Obviously the real fix for our particular case is to not change the UID (which was a terrible hack anyway) but to reduce the UID_MIN used in /etc/logins.def to below the minimum UID required, and hope that there aren’t any clashes between users in LDAP and users which have already been created by packages being added (possibly ages ago…).

Hopefully this saves someone else some trouble with this surprise change in behaviour when upgrades are applied to existing machines and authconfig runs!

Some additional notes:

  • This won’t change until you next run authconfig, which in this case was loooong after the 7.2 update…
  • Not recommended : Putting pam_sss or pam_ldap before pam_unix as a workaround for the pam_unix failures in 7.2. Terrible problems happen with trying to use local users (including root!) if the network goes away.
  • Adding the UID_MIN change as early as possible is a good idea, so in your bootstrap process would be sensible, to avoid package-created users getting added with UIDs near to 1000.
  • These Puppet modules were used in creation of this blog post:
    • joshbeard/login_defs 0.2.0
    • sgnl05/sssd 0.2.1

Merging SELinux policies

We make extensive use of SELinux on all our systems. We manage SELinux config and policy with the jfryman/selinux Puppet module, which means we store SELinux policies in plain text .te format – the same format that audit2allow generates them in.

One of our SELinux policies that covers permissions for NRPE is a large file. When we generate new rules (e.g. for new Nagios plugins) with audit2allow it’s a tedious process to merge the new rules in by hand and mistakes are easy to make.

So I wrote semerge – a tool to merge SELinux policy files with the ability to mix and match stdin/stdout and reading/writing files.

This example accepts input from audit2allow and merges the new rules into an existing policy:

cat /var/log/audit/audit.log | audit2allow | semerge -i existingpolicy.pp -o existingpolicy.pp

And this example deduplicates and alphabetises an existing policy:

semerge -i existingpolicy.pp -o existingpolicy.pp

There are probably bugs so please do let me know if you find it useful and log an issue if you run into problems.

git – deleting local branches that were merged upstream

Like most people, we’re using git right at the centre of our puppet config management workflow. As I’ve mentioned previously, it features prominently in my top 10 most frequently used commands.

Our workflow is based around feature branches, and quite often we end up in a situation where we have a lot of local branches which have already been merged in the copy held upstream on github/gitlab/etc.

Today, I looked and noticed that while we only had 4 active branches on the gitlab server I had 41 branches locally, most of which related to features fixed a long time ago.

This doesn’t cause much of a problem although it can get confusing (especially if you’re likely to re-use a branch name in the future) – 41 branches is enough that deleting them one at a time by hand is tedious.

It looks like some gui tools/IDEs will take care of this for you, but I’m a command line kinda guy, and the git command line tools don’t seem to quite have this functionality baked in.

After a bit of poking about, I came up with the following approach which deletes any branch which no longer exists upstream.


# Delete all stale remote-tracking branches in origin.
git remote prune origin

# "git branch -vv" now includes the word "gone" against branches which the previous command removed, so
# use awk to identify those branches and plumb the list into "git branch -d" which will delete them locally
git branch -vv | awk '/: gone\]/ { print $1 }' | xargs git branch -D

The above seemed to do the right thing for the two repos I tested it on, but well… you might want to try it on something unimportant before you trust it!

NB if a branch has only ever existed locally (and never appeared under origin), it should leave it alone. But I’ve not tested that bit either.

Nagios – aggregating performance data

bind_aggregate

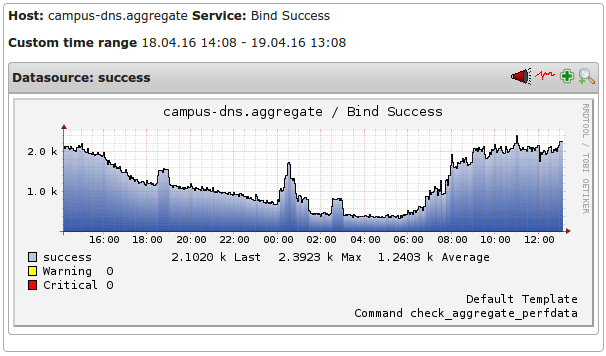
The Wireless team use Nagios to monitor our servers. As well as availability monitoring, we use pnp4nagios to collect and graph performance data. This works reasonably well for us, and we can easily draw graphs of everything from CPU temperature to how many queries/second our mariadb servers are handling.

However, the graphs are drawn on a per-host basis, which wasn’t a problem until now…

Like a lot of people at UoB, we’re migrating services to the f5 load balancers so that we can scale them out as we need to. Services which were previously single hosted are now fronted by several servers in a load balanced configuration.

It would be nice to be able to combine performance data from multiple nodes so we can get a picture of how many queries/second the entire pool is handling. As I’ve written about previously, this sort of information is very useful when it comes to capacity planning.

The f5 will tell us how many tcp/udp connections it’s handling for that pool, and the amount of traffic, but that’s not quite the same thing as the number of queries. Nagios has that information, it just can’t graph it easily.

I had a look around at a few nagios plugins that claimed to solve this problem. The best one I could find looked difficult to deploy without dragging in more dependencies than we wanted to maintain on a production box. It’s licence wasn’t particularly conducive to hacking it about to make it deployable in our environment, so I wrote my own from scratch.

It’s available from here: https://github.com/uobnetops/nagios_aggregate_perfdata

The plugin works by scanning through the status.dat file on the nagios server itself, summarizing the checks/hosts which match. It then reports the sum (or average if that’s what you prefer) as perfdata for nagios to graph.

If you think it might be useful to you, please use it! If you spot something it doesn’t do (or doesn’t do as well as you like) we’re more than happy to accept pull requests or issues logged through github.

DNS Internals: delegating a subdomain to a server listening on a non-standard port

I’m writing this up because it took me quite some time to get my head around how to do this, and I found answers around the internet varying from “not possible” through to “try this” (which didn’t work) and “switch off this security feature you really like having” (no)

I found a way to make it happen, but it’s not easy. I’ll walk you through the problem, and how each way I attempted to solve it failed.

All the names below are hypotheticals, and for the sake of argument we’re trying to make “foo.subdomain.local” resolve via the additional server.

Problem:
Suppose you have two DNS servers. One which we’ll call “NS1” and one which we’ll call “NS-NEW”.

  • NS1 is a recursive server running bind, which all your clients point at to get their DNS information. It’s listening on port 53 as standard.
  • NS-NEW is an authoritative server which is listening on a non-standard port (8600) and for these purposes it’s a black box, we can’t change its behaviour.

You want your clients to be able to resolve the names that NS-NEW is authoritative for, but you don’t want to have to reconfigure the clients. So NS1 needs to know to pass those queries on to NS-NEW to get an answer.

Attempt 1 – “slave zone”
My first thought was to configure NS1 to slave the zone from NS-NEW.

zone "subdomain.local" {
        type slave;
        file "/var/named/slave/priv.zone";
        masters { $IP_OF_NS-NEW port 8600; };
};

This didn’t work for me because NS-NEW isn’t capable of doing zone transfers. Pity, as that would have been really neat and easy to manage!

Attempt 2 – “forward zone”
Then I tried forwarding queries from NS1 to NS-NEW, by using binds “forward zone” features.

zone "subdomain.local" {
        type forward;
        forward only;
        forwarders { $IP_OF_NS-NEW port 8600; };
};

This didn’t work because NS1 is configured to check for valid DNSSEC signatures. The root zone says that all its children are signed, and bind takes that to mean that all the grandchildren of the root should be signed as well.

The software running on NS-NEW isn’t capable of signing its zone information.

It doesn’t appear to be possible to selectively turn off DNSSEC checking on a per-zone basis, and I didn’t want to turn that off for our whole infrastructure as DNSSEC is generally a Good Thing.

Attempt 3 – “delegation”
I did think I could probably work around it by making NS1 authoritative for the “local.” top level domain, then using NS records in the zonefile for “local.” to directly delegate the zone to NS-NEW.

Something like this:

$TTL 86400	; default TTL for this zone
$ORIGIN local.
@       IN  SOA  NS1.my.domain. hostmaster.my.domain. (
                     2016031766 ; serial number
                     28800      ; refresh
                     7200       ; retry
                     604800     ; expire
                     3600       ; minimum
                     )
        IN  NS  NS1.my.domain.

; delegated zones
subdomain  IN  NS NS-NEW.my.domain.

Unfortunately that doesn’t work either, as it’s not possible to specify a port number in an NS record, and NS-NEW isn’t listening on a standard port.

Attempt 3 – “a little of option 2 and a little of option 3”
Hold on to your hats, this gets a little self referential.

I made NS1 authoritative for “local.”

zone "local" {
        type master;
        file "/var/named/data/zone.local";
};

I configured NS records in the “local.” zone file, which point back at NS1

$TTL 86400	; default TTL for this zone
$ORIGIN local.
@       IN  SOA  NS1.my.domain. hostmaster.my.domain. (
                     2016031766 ; serial number
                     28800      ; refresh
                     7200       ; retry
                     604800     ; expire
                     3600       ; minimum
                     )
        IN  NS  NS1.my.domain.

; delegated zones
subdomain  IN  NS NS1.my.domain.

I then configured a “subdomain.local.” forward zone on NS1 which forwards queries on to NS-NEW

zone "subdomain.local" {
        type forward;
        forward only;
        forwarders { $IP_OF_NS-NEW port 8600; };
};

To understand why this works, you need to understand how the recursion process for a query like “foo.subdomain.local.” happens.

When the query comes in NS1 does this:
– do I already know the answer from a previously cached query? Let’s assume no for now.
– do I know which DNS server is responsible for “subdomain.local.” from a previously cached query? Lets assume no for now.
– do I know which DNS server is responsible for “local.” – ooh! Yes! That’s me!
– now I can look in the zone file for “local.” and look to see how I resolve “subdomain.local.” – there’s an NS record which says I should ask NS1 in an authoritative way.
– now I ask NS1 for an answer to “foo.subdomain.local.”
– NS1 can then forward my query off to NS-NEW and fetch an answer.

Because we haven’t had to go all the way up to the root to get our answer, we avoid encountering the DNSSEC issue for this zone.

Did you really do it like *that*?
Yes and no.

The above is a simplified version of what I actually had to do, as our production equivalent of NS1 isn’t a single server – and I had to take account of our zone file management process, and all of that adds complexity which I don’t need to go into.

There are also a few extra hoops to jump through to make sure that the “local.” domain can only be accessed by clients on our network, and to make sure that our authoritative infrastructure doesn’t “leak” the “local.” zone to the outside world.

What would you have liked to have done?
If NS-NEW was able to listen on a standard port, I’d have used a straight delegation to do it.

If NS-NEW was able to sign it’s zone data with DNSSEC, I’d have used a simple forward zone to do it.

NS-NEW isn’t *quite* the black box I treated it as in this article, but the restriction about not being able to make it listen on port 53 is a real one.

The software running on NS-NEW does have a feature request in it’s issue tracker for DNSSEC, which I’ll watch with interest – as that would allow me to tidy up our config and might actually enable some other cool stuff further down the line…

25 years of Internet at University of Bristol

25 years ago today, the University of Bristol joined the Internet.

Well, that’s the headline – but it’s not entirely accurate. By 1991, the University had been connected to other universities around the UK for a while. JANET had been established in 1984 and by 1991 had gateways to ARPANET so by the “small i” definition of internet we were already on the internet.

These days, when we talk about “the Internet” we’re mostly talking about the global TCP/IP network.

In 1991 JANET launched the JANET IP Service (JIPS) which signalled the changeover from Coloured Book software to TCP/IP within the UK academic network. [1]

On the 8th March 1991, the University of Bristol received it’s allocation of the block of public IPv4 address space which we’re still using today.

What follows is a copy of the confirmation email[2] we received from the branch of the American Department of Defence (NIC) which was responsible at the time for allocating address space, and it describes the Class B network 137.222.0.0 had been assigned to us.


---------- Forwarded Message ----------
Date: 08 March 1991 12:46 -0800
From: HOSTMASTER@mil.ddn.nic
To: RICHARD.HOPKINS@uk.ac.bristol
Cc: hostmaster@mil.ddn.nic
Subject: BRISTOL-NET

Richard,

The new class and network number for BRISTOL-NET is:

Class B, #137.222.0.0

NIC Handle of technical POC is: RH438

The NIC handle is an internal record searching tool. If a new Technical
Point of Contact was registered with this application a new NIC handle
has been assigned. If the Technical POC was already registered at the
NIC but their handle was not provided in the application, it has been
listed here for your reference and for use in all future correspondence
with the NIC.

If you require the registration of any hosts or gateways on this
network in the DoD Internet Host Table maintained by the NIC, send the
names and network addresses of these hosts and gateways to
HOSTMASTER@NIC.DDN.MIL.

PLEASE NOTE: The DoD Internet Host Table has grown quite large and
is approaching the limits of manageability. The NIC strongly
discourages the registration of new hosts in the table except in
cases where interoperability with MILNET is essential.
At most, the NIC is prepared to accept no more than 10 initial
registrations from new networks. We encourage you to register any
new hosts or gateways with the domain name servers that will handle
the information your hosts.

It is suggested that host number zero in any network be reserved (not
used), and the host address of all ones (255 in class C networks) in any
network be used to indicate a broadcast datagram.

The association between addresses used in the particular network
hardware and the Internet addresses may be established and maintained by
any method you select. Use of the address resolution procedure
described in RFC 826 is encouraged.

Thanks again for your cooperation!
Linda Medina
-------
---------- End Forwarded Message ----------

So happy quarter-of-a-century-of-IPv4 everyone!

[1] Dates taken from Hobbes’ Internet Timeline http://www.zakon.org/robert/internet/timeline/
[2] The sharp-eyed amongst you will have noticed the format of the To: address that was in use at that time…

Fusion MPT SAS-2 / sas2ircu disk replacement

Just a quick tip for anyone confused about how to replace a failed disk on a Fusion MPT SAS-2 controller under Linux (shows up as 02:00.0 Serial Attached SCSI controller: LSI Logic / Symbios Logic SAS2008 PCI-Express Fusion-MPT SAS-2 [Falcon] (rev 03) via lspci).

The sas2ircu command-line tool is quite “light” on features, and it wasn’t at all obvious to me how to get a replacement disk to re-add to an array. There aren’t any options for replacing a disk in an array, and the server in question has a very minimal remote management console which doesn’t even mention storage at all…

The replacement disk showed up as “Ready (RDY)” in the output of the sas2ircu 0 DISPLAY command, but didn’t automatically replace the failed disk in the array and cause a rebuild.

The only available option for replacing the disk was to set it as a “hot spare” with:

sas2ircu 0 hotspare 2:10

— the disk in question was 2:10 as it was the tenth disk on what showed up as the second (for some reason, even though there’s only one!) enclosure.

This gives a large warning about data loss or corruption, to which you must (after ensuring it’s the correct disk ID!) say YES. Then it adds that disk as a hot spare and then immediately turns uses this for the rebuild of the array with the failed disk.
This adds it back into the array as though nothing had failed at all — which is what I wanted, but couldn’t see another way to do it!

Fairly odd but easy to remember once you realise that there’s no other option with sas2ircu to allow you to replace a failed disk in an array! 🙂

(Maybe there are other tools which make this more obvious, but sas2ircu is the only one I had to hand)

One year of ResNet Gitlab

Today, it has been one year since the first Merge Request (MR) was created and accepted by ResNet* Gitlab. During that time, about 250 working days, we have processed 462 MRs as part of our Puppet workflow. That’s almost two a day!

We introduced Git and Gitlab into our workflow to replace the ageing svn component which didn’t handle branching and merging well at all. Jumping to Git’s versatile branching model and more recently adding r10k into the mix has made it trivially easy to spin up ephemeral dev environments to work on features and fixes, and then to test and release them into the production environment safely.

We honestly can’t work out how on earth we used to cope without such a cool workflow.

Happy Birthday, ResNet Gitlab!

* 1990s ResNet brand for historical reasons only – this Gitlab installation is used mostly for managing eduroam and DNS. Maybe NetOps would have been a better name 🙂

Interesting NFS4 failures on some CentOS 7 clients

We’ve had a couple of clients which use a combination of:

  • NFS4 (no encryption yet, just simple NFS4 with idmapd set as domain bris.ac.uk)
  • automounted file-servers on /net/<hostname>, with bind mounts to get these to appear in /home/<username>
  • CentOS 7
  • kernel 3.10.0-229.20.1.el7.x86_64 (newest at the moment)

..where for some reason they decided to lose the NFS server connection.

Normally you’d just restart a bunch of NFS daemons, along with a ‘umount -l’ of the stuck mounts and continue on your way. In this case, however, we got a kernel thread showing up in uninterruptible sleep
with a name of [<IP-of-NFS-server>-ma]. (Square brackets because kernel threads show up in ps output in that format)

Looking at /proc/<PID>/stack for this PID showed that it was trying to recover a failed NFS mount, and then was waiting for an RPC response
(stuck in the rpc_wait_bit_killable function, despite not being possible to kill).

Has anyone else seen this behaviour?

I’ve just had two servers with the exact same install and kernel version do this, one at about 1am this morning and then the other at about 1pm
this afternoon.
A third machine with an identical install but a slightly older kernel version hasn’t hit this problem, so I’m erring toward it being a kernel NFS4 bug.

(Have rebooted both compute servers as that was the only possible recovery method it seemed, and picked a previous kernel version for one of the hosts to see if the behaviour changes…)

Posted in NFS