Getting to grips with GitLab CI

Background

Continuous Integration (CI) refers to the concept of automatically testing, building and deploying code as often as possible. This concept has been around in the world of software development for some time now, but it’s new to sysadmins like me.

While the deliverables produced by developers might be more tangible (a mobile app, a website, etc), with the rise of infrastructure as code, sysadmins and network admins are increasingly describing the state of their systems as code in a configuration management system. This is great, as it enables massive automation and scaling. It also opens the door for a more development-like workflow, including some of the tools and knowledge used by developers.

This article describes our progress using a CI workflow to save time, improve quality and reduce risk with our day-to-day infrastructure operations.

Testing, testing…

The Wireless team have used the Puppet configuration management system for several years, for managing server infrastructure, deploying applications and the suchlike. We keep our code in GitLab and do our best to follow best practice when branching/merging. However, one thing we don’t do is automatic testing. When a branch is ready for merging we test manually by moving a test server into that Puppet environment, and seeing if it works properly.

GitLab CI

The IT Services GitLab server at git.services.bristol.ac.uk now provides the GitLab CI service, which at its simplest is a thing that executes a script against your repository to check some properties of it. I thought I would start off simple and write some CI tests to be executed against our Puppet repo to do syntax checking. There are already tools that can do the syntax checking (such as puppet-lint), so all I need to do is write a CI test that executes them.

There’s a snag, though. What is going to execute these tests, and where? How are we going to ensure the execution environment is suitable?

GitLab CI runs on the GitLab server itself, but it executes CI tests in CI runners. Runners can be hosted on the GitLab server, on a different server or in the cloud. To start off simple, I created a new VM to host a single CI runner. So far so good, but the simplest possible runner configuration simply executes the CI tests in a shell on the system it is running on. Security concerns aside, this is also a bad idea because the only environment available is the one the runner is hosted on, and what if a CI test changes the state of the environment? Will the second test execute in the same way?

Docker

This is where Docker steps in. Docker is a container platform which has the ability to create and destroy lightweight, yet self-contained containers on demand. To the uninitiated, you could kind-of, sort-of think of Docker containers as VMs. GitLab CI can make use of Docker containers to execute CI tests. Each CI test is executed in a factory-fresh Docker container which is destroyed after the test has completed, so you can be sure of consistent testing, and it doesn’t matter if you accidentally break the container. The user can specify which Docker image to use for each test.

A real example

So far, this is all talk. Let me show you the components of the simple CI tests I’ve written for our Puppet control repo.

The CI config itself is stored in the root of your git repo, in a file called.gitlab-ci.yml. The presence of this file magically enables CI pipelines in your project. The file tells GitLab CI how to find a runner, which Docker image to use and what tests to execute. Let’s have a look at the config file we’re using for our Puppet repo:

# Docker image to use for these tests
image: git.services.bristol.ac.uk:4567/resnet/netops-ci:master

# Different stages in which to run tests. Only proceed to the
# next stage if the current one passes
stages:
  # check: syntax checking
  - check
  # style: linting
  - style

# Check Puppet syntax
puppet-parser:
  stage: check
  script:
    - tests/check-puppet-parser.sh
  only:
    - branches

# Check ERB template syntax
check-erb:
  stage: check
  script:
    - tests/check-erb.sh
  only:
    - branches

# Check YAML (Hiera) syntax
check-yaml:
  stage: check
  script:
    - tests/check-yaml.sh
  only:
    - branches

# Check Puppet linting style
puppet-lint:
  stage: style
  script:
    - tests/style-puppet-lint.sh
  only:
    - branches

All of the tests are executed in the same way: by calling shell scripts that are in the tests subdirectory of the repo. They have been sorted into two stages – after all, there’s no point in proceeding to run style checks if the syntax isn’t valid. Each one of these tests runs in its own Docker container without fear of contamination.

To give an idea of how simple these CI test scripts are, here’s the one we use to check Puppet syntax – it’s just a one-liner that finds all Puppet manifests in the repo and executes puppet parser validate against each one:

#!/bin/bash
set -euo pipefail

find . -type f -name '*.pp' -print0 | xargs -0 /opt/puppetlabs/bin/puppet parser validate

How CI fits with our workflow

In the configuration we are using, the test suite is executed against the codebase for every commit on every branch. It can also be configured only to run when tags are created, or only on the master branch, etc. For us, this decision is a reflection that we are using an interpreted language, there is no “build” stage and that every branch in the repo becomes a live Puppet environment.

The tests are always run in the background and if they succeed, you get a little green tick at various places throughout the GitLab interface to show you that your commit, branch or merge request is passing (has passed the most recent test).

Project summary showing CI status OK

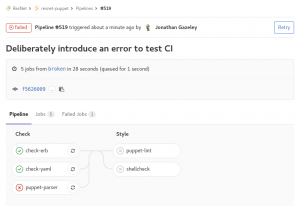
If, however, you push a bad commit that fails testing then you get an email, and all the green ticks turn to red crosses. You can drill down into the failed pipeline, see which specific tests failed, and what errors they returned.

Failed tests

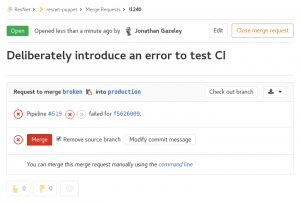
If you carry on regardless and create a merge request for a branch that is failing tests, it won’t let you accept that merge request without a dire warning.

Merge request which failed CI tests

Combining the CI pipeline with setting your master or production branch to be a protected branch means it should be impossible to merge code that has syntax errors. Pretty cool, and a great way of decreasing risk when merging code to production.

I want to play!

Hopefully this article has shown how easy it is to get started running basic CI tests on GitLab CI with Docker. To make things even easier, I have created a repository of sample GitLab CI configs and tests. Have a wander over to the gitlab-ci repo and look at the examples I’ve shared. At the time of writing, there are are configs and tests suitable for doing syntax checks on Puppet configs, Perl/Python/Ruby/Shell scripts and Dockerfiles.

The repo is open to all IT Services staff to read and contribute to, so please do share back any useful configs and tests you come up with.

N.B At the time of writing, the GitLab CI service is provided by a small VM as a proof of concept so tests may be slow if too many people jump on this cool bandwagon. We are in the process of acquiring some better hardware to host CI runners.

As ever, we recommend all GitLab users join the #gitlab-users channel on Slack for informal support and service notifications.

Looking ahead

These CI tests are a simple example of using Docker containers to execute trivial tests and return nothing but an error code. In the future we will be looking to create more complex CI pipelines, including:

  • Functional tests, which actually attempt to execute the code and make sure it works as designed rather than just checking the syntax
  • Tests that return artefacts, such as a pipeline that returns RPMs after running rpmbuild to build them
  • Tests that deploy the end product to a live environment after testing it, rather than just telling a human operator that it’s safe to deploy
One year of ResNet Gitlab

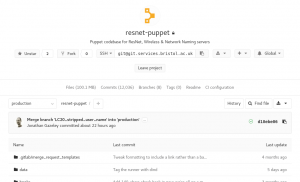
Today, it has been one year since the first Merge Request (MR) was created and accepted by ResNet* Gitlab. During that time, about 250 working days, we have processed 462 MRs as part of our Puppet workflow. That’s almost two a day!

We introduced Git and Gitlab into our workflow to replace the ageing svn component which didn’t handle branching and merging well at all. Jumping to Git’s versatile branching model and more recently adding r10k into the mix has made it trivially easy to spin up ephemeral dev environments to work on features and fixes, and then to test and release them into the production environment safely.

We honestly can’t work out how on earth we used to cope without such a cool workflow.

Happy Birthday, ResNet Gitlab!

* 1990s ResNet brand for historical reasons only – this Gitlab installation is used mostly for managing eduroam and DNS. Maybe NetOps would have been a better name 🙂

soc::puppet – A puppet themed social event for UoB (Thursday 19th March)

What: soc::puppet is a puppet themed meet up for University of Bristol Staff using, or interested in puppet configuration management  (rather than actual marionettes or glove puppets)
Where: Brambles in The Hawthorns (see the link for details)
When: 5pm-7pm(ish) Thursday 19th March 2015

There’s a growing community of people around the University of Bristol using (or interested in using) puppet configuration management http://puppetlabs.com Some of those people are talking to eachother, and some just don’t know who to talk to yet!

Experience, use case and scale of implementation varies widely, but we’ve all got something to share! 🙂

With that in mind, there seems to be interest in an informal gathering of interested people, where we can get together, share ideas and build a local puppet community.  Bringing together all those informal corridor/tearoom chats and spreading the exciting ideas/knowledge around in a loose, informal manner.

As a first pass, we’ve booked “Brambles” which is the new name for the Staff Club space in The Hawthorns, for a couple of hours after work on Thursday 19th March.  If it goes well, it will hopefully turn into a regular event.

Our initial aim is to make it as informal as possible (hence doing it outside work hours, no pressure to minute it, assign actions, instigate formalised project teams etc) and treat it mostly as an exercise in putting people in touch with other people who are playing with similar toys.

That said, there are a few “bits of business” to take care of at the first meeting, so I’m suggesting the following as a vague agenda.

  1. Welcome!  What’s this about? (about 5 minutes)
  2. Introductions, very quick “round table” to introduce everyone, and say what level of exposure they’ve had to puppet so far (about 10 minutes)
  3. Everything beyond this point will be decided on the day.  If you’ve got something you’d like to talk about or present on, bring it with you!
  4. We’ll close the session with a very quick “should we do this again?” and “call for volunteers”

If people are interested, we can move on to a pub afterwards to continue the discussion.

The facilities available are a bit limited, and apparently the projector isn’t available at the moment, but we’ll see what direction it takes – and as they say in Open Space circles, “Whatever happens is the only thing that could have, be prepared to be surprised!”

Puppet future parser — what to expect that you’ll have to update in your manifests…

The Puppet Future Parser is the new implementation of the manifest parser which will become the default in 4.0, so I thought I’d take a look to see what I’d need to update.

Also, there are some fancy new features like iteration and that you can use [1,2] array notation or {a=>b} hash notation anywhere that you’d previously used a variable containing an array or hash.

The iteration and lambda features are intended to replace create_resources calls, as they are more flexible and can loop round repeatedly to create individual definitions.

For example, here’s a dumb “sudo” profile which uses the each construct to iterate over an array:

class profiles::sudo {
  # This is a particularly dumb version of use of sudo, to allow any commands:
  $admin_users = hiera_array('admin_users')
  # Additional users with special sudo rights, but no ssh access (e.g. root):
  $sudo_users  = hiera_array('sudo_users')

  class { ::sudo: }

  $all_sudo_users = concat($sudo_users, $admin_users)

  # Create a resource for each entry in the array:
  each($all_sudo_users) |$u| {
    sudo::entry { $u:
      comment  => "Allow ${u} to run anything as any user",
      username => $u,
      host     => 'ALL',
      as_user  => 'ALL',
      as_group => 'ALL',
      nopasswd => false,
      cmd      => 'ALL',
    }
  }
}

Making this work with create_resources and trying to splice in the the username for each user in the list into a hash looked like it would be messy, requiring at least an additional layer of define — this method is much neater.

This makes it much easier to create data abstractions over existing modules — you can programmatically massage the data you read from your hiera files and call definitions using that data in a much more flexible way than when passing hashes to create_resources. This “glue” can be separated into your roles and profiles (which could be the subject of another post but are described well in this blog post), creating a layer which separates the use of the module from the data which drives that use nicely.

So this all sounds pretty great, but there are a few changes you’ll possibly encounter when switching to the future parser:

  • Similar to the switch from puppet master to puppet server, the future parser is somewhat more strict about data formats. e.g. I found that my hiera data definitely needed to be properly quoted when I started using puppet server, so entries like mode : 644 in a file hash wouldn’t give the number you were expecting… (needs mode : 0644 or mode : '644' to avoid conversion from octal to decimal…). The future parser extends this to being more strict in your manifests, so a similarly-incorrect file { ... mode => 644 } declaration needs quoting or a leading zero. If you use puppet-lint you’ll catch this anyway — so use it! 🙂
  • It’s necessary to use {} instead of undef when setting default values for hiera_hash (and likewise [] instead of undef for hiera_array), to allow conditional expressions of the form if $var { ... } to work as intended. It seems that in terms of falseness for arrays and hashes that undef is in fact true… (could be a bug, as this page in the docs says: “When used as a boolean, undef is false”)
  • Dynamically-scoped variables (which are pretty mad and difficult to follow anyway, which is why most languages avoid them like the plague…) don’t pass between a class and any sub-classes which it creates. This is in the docs here, but it’s such a common pattern that it could well have made it through from your old (pre-Puppet 2.7) manifests and still have been working OK until the switch to the future parser. e.g.:
    class foo {
      $var = "x"
    }
    
    class bar {
      include foo
      # $var isn't defined here, as dynamic scope rules don't allow it in Puppet >2.7
    }
    

    Instead you need to explicitly qualify your variables to pull them out of the correct scope — $foo::var in this case. In your erb templates, as a common place where the dynamically-scoped variables might have ended up getting used, you can now use scope['::foo::var'] as a shorthand for the previously-longer scope.lookupvar('::foo::var') to explicitly qualify the lookup of variables. The actual scope rules for Puppet < 2.7 are somewhat more complicated and often led to confusing situations if you unintentionally used dynamic scoping, especially when combined with overriding variables from the parent scope…

  • I’m not sure that expressions of the form if "foo" in $arrayvar { ... } work how they should, but I’ve not had a chance to investigate this properly yet.

Most of these are technically the parser more strictly adhering to the specifications, but it’s easy to have accidentally had them creep into your manifests if you’re not being good and using puppet-lint and other tools to check them.

In conclusion : Start using the Future Parser soon! It adds excellent features for iteration which make abstracting data a whole lot easier than using the non-future (past?) parser allows. Suddenly the combination of roles, profiles and the iteration facilities in the future parser mean that abstraction using Puppet and hiera makes an awful lot more sense!

Publish a Module on Puppet Forge

I’ve started publishing as many of my Puppet modules as possible on Puppet Forge. It isn’t hard to do but there are a few things to know. This guide is largely based on Puppetlabs’ own guide Publishing Modules on the Puppet Forge.

  1. For home-grown modules that have grown organically, you are likely to have at least some site-specific data mixed in with the code. Before publishing, you’ll need to abstract this out. I recommend using parametrised classes with sane defaults for your inputs. If necessary, you can have a local wrapper class to pass site-specific values into your module.
  2. The vast majority of Puppet modules are on GitHub, but this isn’t actually a requirement. GitHub offers public collaboration and issue tracking, but you can keep your code wherever you like.
  3. Before you can publish, you need to include some metadata with your module. Look at the output of puppet module generate. If you’re starting from scratch, this command is an excellent place to start. If you’re patching up an old module for publication, run it in a different location and selectively copy the useful files into your module. The mandatory files are metadata.json and README.md.
  4. When you’re ready to publish, run puppet module build. This creates a tarball of your module and metadata which is ready to upload to Puppet Forge.
  5. Create an account on Puppet Forge and upload your tarball. It will automatically fill in the metadata.
  6. Install your module on your Puppetmaster by doing puppet module install myname/mymodule

Building a Gitlab server with Puppet

GitHub is an excellent tool for code-sharing, but it has the major disadvantage of being fully public. You probably don’t want to put your confidential stuff and shared secrets in there! You can pay for private repositories, but the issue still stands that we shouldn’t be putting confidential UoB things in a non-approved cloud provider.

I briefly investigated several self-hosted pointy-clicky Git interfaces, including Gitorious, Gitolite, GitLab, Phabricator and Stash. They all have their relative merits but they all seem to be a total pain to install and run in a production environment, often requiring that we randomly git clone something into the webroot and then not providing a sane upgrade mechanism. Many of them have dependencies on modules not included with the enterprise Linux distributions

In the end, the easiest-to-deploy option seemed to be to use the GitLab Omnibus installer. This bundles the GitLab application with all its dependencies in a single RPM for ease of deployment. There’s also a Puppet Forge module called spuder/gitlab which makes it nice and easy to install on a Puppet-managed node.

After fiddling, my final solution invokes the Forge module like this:

class { 'gitlab' : 
  puppet_manage_config          => true,
  puppet_manage_backups         => true,
  puppet_manage_packages        => false,
  gitlab_branch                 => '7.4.3',
  external_url                  => "https://${::fqdn}",
  ssl_certificate               => '/etc/gitlab/ssl/gitlab.crt',
  ssl_certificate_key           => '/etc/gitlab/ssl/gitlab.key',
  redirect_http_to_https        => true,
  backup_keep_time              => 5184000, # 5184000 = 60 days
  gitlab_default_projects_limit => 100,
  gitlab_download_link          => 'https://downloads-packages.s3.amazonaws.com/centos-6.5/gitlab-7.4.3_omnibus.5.1.0.ci-1.el6.x86_64.rpm',
  gitlab_email_from             => 'gitlab@example.com',
  ldap_enabled                  => true,
  ldap_host                     => 'ldap.example.com',
  ldap_base                     => 'CN=Users,DC=example,DC=com',
  ldap_port                     => '636',
  ldap_uid                      => 'uid',
  ldap_method                   => 'ssl',
  ldap_bind_dn                  => 'uid=ldapuser,ou=system,dc=example,dc=com',
  ldap_password                 => '*********',
}

I also added a couple of resources to install the certificates and create a firewall exception, to make a complete working deployment.

The upgrade path requires manual intervention, but is mostly automatic. You just need to change gitlab_download_link to point to a newer RPM and change gitlab_branch to match.

If anyone is interested, I’d be happy to write something about the experience of using GitLab after a while, when I’ve found out some of the quirks.

Update by DaveG! (in lieu of comments currently on this site)

Gitlab have changed their install process to require use of their repo, so this module doesn’t like it very much. They’ve also changed the package name to ‘gitlab-ce’ rather than just ‘gitlab’.

To work around this I needed to:

  • Add name => 'gitlab-ce' to the package { 'gitlab': ... } params in gitlab/manifests/install.pp
  • Find the package RPM for a new shiny version of Gitlab. 7.11.4 in this case, via https://packages.gitlab.com/gitlab/gitlab-ce?filter=rpms
  • Copy the RPM to a local web-accessible location as a mirror, and use this as the location for the gitlab_download_link class parameter

This seems to have allowed it to work fine!
(Caveat: I had some strange behaviour with whether it would run the gitlab instance correctly, but I’m not sure if that’s because of left-overs from a previous install attempt. Needs more testing!)

How to use SELinux

SELinux is one of the least well understood components of modern Linux distributions. Search any forum or mailing list and you are likely to find recommendations to switch it off because it “breaks things”. When we decided to migrate the ResNet and eduroam servers from CentOS 5 to 6, we took the decision to move from “SELinux off by default” to “SELinux on by default, and only off where necessary”. Turns out it’s not that hard to configure 🙂

Introduction

Explaining exactly how SELinux works is beyond the scope of this blog post – but suffice it to say that it works by labelling parts of the filesystem, users and processes with a context to say what they are for. It will then block actions it thinks are unsafe – for example, even if your httpd has filesystem permissions to write to /etc/ssh/, by default SELinux would block this action because it isn’t usual. To learn more, have a look at the many web pages about SELinux.

Configuring SELinux

Configuring SELinux to work nicely on your system is best described as “training” it, and is a lot like training a spam filter. You have to look at the SELinux audit log to see what actions were blocked, review them, and then add them to a whitelist by loading a new policy. You can load as many supplementary policies as you need.

Your SELinux installation should always be left in enforcing mode by default. Edit /etc/selinux/config to make sure it is enforcing, but be aware that this needs a reboot to take effect.

# /etc/selinux/config
SELINUX=enforcing
SELINUXTYPE=targeted

When you want to temporarily enable permissive mode, issue the command sudo setenforce 0. This takes effect immediately. Don’t forget to run sudo setenforce 1 to re-enable enforcing mode after you’ve finished debugging.

When you start out configuring SELinux, it’s important to run it in permissive mode, rather than enforcing mode. Let’s say you want to debug an application that wants to perform operations A, B and C, which would all be blocked by SELinux. In permissive mode, the application would be allowed to run, and SELinux logs what it would have blocked had it been in enforcing mode. Operations A, B and C are all logged and can then be added to the policy. In enforcing mode, the application tries operation A, is blocked and often doesn’t even bother trying operations B and C – so they are never logged, and cannot be debugged.

Capturing SELinux audit logs and generating a policy

All SELinux operations are stashed in the audit log, which is in /var/log/audit/audit.log on CentOS by default. The audit log is not hugely easy to read by eye, but you can install the package policycoreutils-python which provides some handy analysis tools.

Assuming you’ve already dropped SELinux into permissive mode, now try executing the operations you wish to debug: might be testing a Nagios plugin, running a new application, or something else. It should succeed as SELinux is permissive, but it will log all the things it would otherwise have blocked.

Run this command, grepping for the process you’re interested in to generate a policy file to grant all those accesses. Be aware of namespacing issues. SELinux comes with a bunch of bundled policies which are called things like nagios and httpd. If you are loading supplementary policies for these things, it’s best to add a prefix like resnet-nagios or sysops-nagios. The default file extension for a text-mode policy is .te.

sudo cat /var/log/audit/audit.log | grep nagios | audit2allow -m resnet-nagios > resnet-nagios.te

Your .te file is more-or-less human readable and you should inspect it to make sure your new policy isn’t going to allow anything bad. Here’s the .te file I generated by running the above command on my Nagios server:

module resnet-nagios 1.0;

require {
  type nagios_system_plugin_t;
  type nagios_t;
  type tmp_t;
  type initrc_tmp_t;
  type nagios_services_plugin_t;
  class file { read ioctl write getattr open append };
}

#============= nagios_services_plugin_t ==============
allow nagios_services_plugin_t tmp_t:file append;

#============= nagios_system_plugin_t ==============
allow nagios_system_plugin_t tmp_t:file append;

#============= nagios_t ==============
allow nagios_t initrc_tmp_t:file { read write getattr open ioctl };
#!!!! The source type 'nagios_t' can write to a 'file' of the following types:
# nagios_var_run_t, nagios_log_t, nagios_tmp_t, root_t

allow nagios_t tmp_t:file { write ioctl read open getattr append };

Loading a custom SELinux policy by hand

Now that we’ve come up with a text-based SELinux policy, it needs to be converted into a binary policy that can be loaded. The command is very similar but note the capital M rather than lower case, which makes it write out a binary policy which has a .pp extension (not to be confused with Puppet manifests ;))

sudo cat /var/log/audit/audit.log | grep nagios | audit2allow -M resnet-nagios

Once you’ve got your binary SELinux module, loading it by hand is easy:

sudo semodule -i resnet-nagios.pp

The CentOS wiki page on SELinux is handy for manipulating policies manually.

Loading a custom SELinux policy with Puppet

There are Puppet modules available which handle the compiling and loading of modules automatically – you just need to provide the .te file and it will handle the rest. For the ResNet and eduroam servers, we are using James Fryman’s puppet-selinux module. It’s not necessarily the best but it was the most appropriate for us at the time we took the decision over a year ago and has worked solidly – other modules are also available. Here’s how we’re using it:

include selinux
if $::osfamily == 'RedHat' {
  selinux::module { 'resnet-nagios':
    ensure => 'present',
    source => 'puppet:///modules/nagios/resnet-nagios.te',
  }
}

Summary

That’s more or less it! It’s easy to set SELinux in permissive mode, capture output and create your own policies. There really is no excuse not to be using it 😉

I hope this article has been useful. If you’re a member of UoB and you want to talk about SELinux or Puppet, grab me on the #uob-unix IRC channel. I’m dj_judas21.