Getting to grips with GitLab CI

Background

Continuous Integration (CI) refers to the concept of automatically testing, building and deploying code as often as possible. This concept has been around in the world of software development for some time now, but it’s new to sysadmins like me.

While the deliverables produced by developers might be more tangible (a mobile app, a website, etc), with the rise of infrastructure as code, sysadmins and network admins are increasingly describing the state of their systems as code in a configuration management system. This is great, as it enables massive automation and scaling. It also opens the door for a more development-like workflow, including some of the tools and knowledge used by developers.

This article describes our progress using a CI workflow to save time, improve quality and reduce risk with our day-to-day infrastructure operations.

Testing, testing…

The Wireless team have used the Puppet configuration management system for several years, for managing server infrastructure, deploying applications and the suchlike. We keep our code in GitLab and do our best to follow best practice when branching/merging. However, one thing we don’t do is automatic testing. When a branch is ready for merging we test manually by moving a test server into that Puppet environment, and seeing if it works properly.

GitLab CI

The IT Services GitLab server at git.services.bristol.ac.uk now provides the GitLab CI service, which at its simplest is a thing that executes a script against your repository to check some properties of it. I thought I would start off simple and write some CI tests to be executed against our Puppet repo to do syntax checking. There are already tools that can do the syntax checking (such as puppet-lint), so all I need to do is write a CI test that executes them.

There’s a snag, though. What is going to execute these tests, and where? How are we going to ensure the execution environment is suitable?

GitLab CI runs on the GitLab server itself, but it executes CI tests in CI runners. Runners can be hosted on the GitLab server, on a different server or in the cloud. To start off simple, I created a new VM to host a single CI runner. So far so good, but the simplest possible runner configuration simply executes the CI tests in a shell on the system it is running on. Security concerns aside, this is also a bad idea because the only environment available is the one the runner is hosted on, and what if a CI test changes the state of the environment? Will the second test execute in the same way?

Docker

This is where Docker steps in. Docker is a container platform which has the ability to create and destroy lightweight, yet self-contained containers on demand. To the uninitiated, you could kind-of, sort-of think of Docker containers as VMs. GitLab CI can make use of Docker containers to execute CI tests. Each CI test is executed in a factory-fresh Docker container which is destroyed after the test has completed, so you can be sure of consistent testing, and it doesn’t matter if you accidentally break the container. The user can specify which Docker image to use for each test.

A real example

So far, this is all talk. Let me show you the components of the simple CI tests I’ve written for our Puppet control repo.

The CI config itself is stored in the root of your git repo, in a file called.gitlab-ci.yml. The presence of this file magically enables CI pipelines in your project. The file tells GitLab CI how to find a runner, which Docker image to use and what tests to execute. Let’s have a look at the config file we’re using for our Puppet repo:

# Docker image to use for these tests
image: git.services.bristol.ac.uk:4567/resnet/netops-ci:master

# Different stages in which to run tests. Only proceed to the
# next stage if the current one passes
stages:
  # check: syntax checking
  - check
  # style: linting
  - style

# Check Puppet syntax
puppet-parser:
  stage: check
  script:
    - tests/check-puppet-parser.sh
  only:
    - branches

# Check ERB template syntax
check-erb:
  stage: check
  script:
    - tests/check-erb.sh
  only:
    - branches

# Check YAML (Hiera) syntax
check-yaml:
  stage: check
  script:
    - tests/check-yaml.sh
  only:
    - branches

# Check Puppet linting style
puppet-lint:
  stage: style
  script:
    - tests/style-puppet-lint.sh
  only:
    - branches

All of the tests are executed in the same way: by calling shell scripts that are in the tests subdirectory of the repo. They have been sorted into two stages – after all, there’s no point in proceeding to run style checks if the syntax isn’t valid. Each one of these tests runs in its own Docker container without fear of contamination.

To give an idea of how simple these CI test scripts are, here’s the one we use to check Puppet syntax – it’s just a one-liner that finds all Puppet manifests in the repo and executes puppet parser validate against each one:

#!/bin/bash
set -euo pipefail

find . -type f -name '*.pp' -print0 | xargs -0 /opt/puppetlabs/bin/puppet parser validate

How CI fits with our workflow

In the configuration we are using, the test suite is executed against the codebase for every commit on every branch. It can also be configured only to run when tags are created, or only on the master branch, etc. For us, this decision is a reflection that we are using an interpreted language, there is no “build” stage and that every branch in the repo becomes a live Puppet environment.

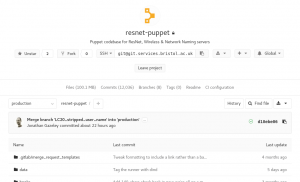
The tests are always run in the background and if they succeed, you get a little green tick at various places throughout the GitLab interface to show you that your commit, branch or merge request is passing (has passed the most recent test).

Project summary showing CI status OK

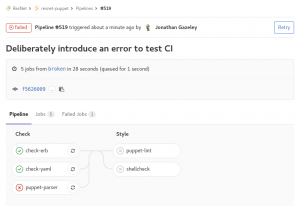
If, however, you push a bad commit that fails testing then you get an email, and all the green ticks turn to red crosses. You can drill down into the failed pipeline, see which specific tests failed, and what errors they returned.

Failed tests

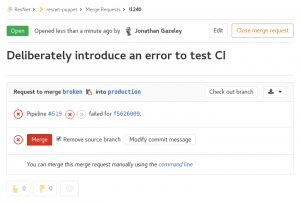
If you carry on regardless and create a merge request for a branch that is failing tests, it won’t let you accept that merge request without a dire warning.

Merge request which failed CI tests

Combining the CI pipeline with setting your master or production branch to be a protected branch means it should be impossible to merge code that has syntax errors. Pretty cool, and a great way of decreasing risk when merging code to production.

I want to play!

Hopefully this article has shown how easy it is to get started running basic CI tests on GitLab CI with Docker. To make things even easier, I have created a repository of sample GitLab CI configs and tests. Have a wander over to the gitlab-ci repo and look at the examples I’ve shared. At the time of writing, there are are configs and tests suitable for doing syntax checks on Puppet configs, Perl/Python/Ruby/Shell scripts and Dockerfiles.

The repo is open to all IT Services staff to read and contribute to, so please do share back any useful configs and tests you come up with.

N.B At the time of writing, the GitLab CI service is provided by a small VM as a proof of concept so tests may be slow if too many people jump on this cool bandwagon. We are in the process of acquiring some better hardware to host CI runners.

As ever, we recommend all GitLab users join the #gitlab-users channel on Slack for informal support and service notifications.

Looking ahead

These CI tests are a simple example of using Docker containers to execute trivial tests and return nothing but an error code. In the future we will be looking to create more complex CI pipelines, including:

  • Functional tests, which actually attempt to execute the code and make sure it works as designed rather than just checking the syntax
  • Tests that return artefacts, such as a pipeline that returns RPMs after running rpmbuild to build them
  • Tests that deploy the end product to a live environment after testing it, rather than just telling a human operator that it’s safe to deploy
Migrating gitlab projects

If you’re migrating a gitlab project from one server to another, unless the two gitlab instances are the same major revision you may run into a couple of problems with the export/import procedure.

The first error you’re likely to hit is something like:

The repository could not be imported.
Error importing repository into pp-computing/todo-list - Import version mismatch: Required 0.1.8 but was 0.1.6

This is because whenever there is a potentially “dangerous” change to the import script, gitlab “fails safe” and refuses to import the project. If the two numbers are reasonably close together (and your project is straight forward enough that you can carefully check the users, permissions, wiki pages, issues and milestones etc then you can try this to pretend that your export tarball is newer than it really is:


mkdir project_export
tar xfv old_export_file.tar.gz -C project_export
cd project_export
echo '0.1.8' > VERSION
tar czf experimental_new_project_export.tar.gz *

If you have milestones in your project, you may hit another error if you’re migrating from a gitlab instance that is older than 9.5 is:


Error importing repository into my-group/my-project - Validation failed: Group milestone should belong either to a project or a group.

The workaround for this one appears to be to import your project into your personal gitlab space, and then “move” it to your group space.

If you hit any errors not covered in the above, let us know below!

(And don’t forget you’ll need to update your remotes in any checked out working copies you have!)

git – deleting local branches that were merged upstream

Like most people, we’re using git right at the centre of our puppet config management workflow. As I’ve mentioned previously, it features prominently in my top 10 most frequently used commands.

Our workflow is based around feature branches, and quite often we end up in a situation where we have a lot of local branches which have already been merged in the copy held upstream on github/gitlab/etc.

Today, I looked and noticed that while we only had 4 active branches on the gitlab server I had 41 branches locally, most of which related to features fixed a long time ago.

This doesn’t cause much of a problem although it can get confusing (especially if you’re likely to re-use a branch name in the future) – 41 branches is enough that deleting them one at a time by hand is tedious.

It looks like some gui tools/IDEs will take care of this for you, but I’m a command line kinda guy, and the git command line tools don’t seem to quite have this functionality baked in.

After a bit of poking about, I came up with the following approach which deletes any branch which no longer exists upstream.


# Delete all stale remote-tracking branches in origin.
git remote prune origin

# "git branch -vv" now includes the word "gone" against branches which the previous command removed, so
# use awk to identify those branches and plumb the list into "git branch -d" which will delete them locally
git branch -vv | awk '/: gone\]/ { print $1 }' | xargs git branch -D

The above seemed to do the right thing for the two repos I tested it on, but well… you might want to try it on something unimportant before you trust it!

NB if a branch has only ever existed locally (and never appeared under origin), it should leave it alone. But I’ve not tested that bit either.

One year of ResNet Gitlab

Today, it has been one year since the first Merge Request (MR) was created and accepted by ResNet* Gitlab. During that time, about 250 working days, we have processed 462 MRs as part of our Puppet workflow. That’s almost two a day!

We introduced Git and Gitlab into our workflow to replace the ageing svn component which didn’t handle branching and merging well at all. Jumping to Git’s versatile branching model and more recently adding r10k into the mix has made it trivially easy to spin up ephemeral dev environments to work on features and fixes, and then to test and release them into the production environment safely.

We honestly can’t work out how on earth we used to cope without such a cool workflow.

Happy Birthday, ResNet Gitlab!

* 1990s ResNet brand for historical reasons only – this Gitlab installation is used mostly for managing eduroam and DNS. Maybe NetOps would have been a better name 🙂

Building a Gitlab server with Puppet

GitHub is an excellent tool for code-sharing, but it has the major disadvantage of being fully public. You probably don’t want to put your confidential stuff and shared secrets in there! You can pay for private repositories, but the issue still stands that we shouldn’t be putting confidential UoB things in a non-approved cloud provider.

I briefly investigated several self-hosted pointy-clicky Git interfaces, including Gitorious, Gitolite, GitLab, Phabricator and Stash. They all have their relative merits but they all seem to be a total pain to install and run in a production environment, often requiring that we randomly git clone something into the webroot and then not providing a sane upgrade mechanism. Many of them have dependencies on modules not included with the enterprise Linux distributions

In the end, the easiest-to-deploy option seemed to be to use the GitLab Omnibus installer. This bundles the GitLab application with all its dependencies in a single RPM for ease of deployment. There’s also a Puppet Forge module called spuder/gitlab which makes it nice and easy to install on a Puppet-managed node.

After fiddling, my final solution invokes the Forge module like this:

class { 'gitlab' : 
  puppet_manage_config          => true,
  puppet_manage_backups         => true,
  puppet_manage_packages        => false,
  gitlab_branch                 => '7.4.3',
  external_url                  => "https://${::fqdn}",
  ssl_certificate               => '/etc/gitlab/ssl/gitlab.crt',
  ssl_certificate_key           => '/etc/gitlab/ssl/gitlab.key',
  redirect_http_to_https        => true,
  backup_keep_time              => 5184000, # 5184000 = 60 days
  gitlab_default_projects_limit => 100,
  gitlab_download_link          => 'https://downloads-packages.s3.amazonaws.com/centos-6.5/gitlab-7.4.3_omnibus.5.1.0.ci-1.el6.x86_64.rpm',
  gitlab_email_from             => 'gitlab@example.com',
  ldap_enabled                  => true,
  ldap_host                     => 'ldap.example.com',
  ldap_base                     => 'CN=Users,DC=example,DC=com',
  ldap_port                     => '636',
  ldap_uid                      => 'uid',
  ldap_method                   => 'ssl',
  ldap_bind_dn                  => 'uid=ldapuser,ou=system,dc=example,dc=com',
  ldap_password                 => '*********',
}

I also added a couple of resources to install the certificates and create a firewall exception, to make a complete working deployment.

The upgrade path requires manual intervention, but is mostly automatic. You just need to change gitlab_download_link to point to a newer RPM and change gitlab_branch to match.

If anyone is interested, I’d be happy to write something about the experience of using GitLab after a while, when I’ve found out some of the quirks.

Update by DaveG! (in lieu of comments currently on this site)

Gitlab have changed their install process to require use of their repo, so this module doesn’t like it very much. They’ve also changed the package name to ‘gitlab-ce’ rather than just ‘gitlab’.

To work around this I needed to:

  • Add name => 'gitlab-ce' to the package { 'gitlab': ... } params in gitlab/manifests/install.pp
  • Find the package RPM for a new shiny version of Gitlab. 7.11.4 in this case, via https://packages.gitlab.com/gitlab/gitlab-ce?filter=rpms
  • Copy the RPM to a local web-accessible location as a mirror, and use this as the location for the gitlab_download_link class parameter

This seems to have allowed it to work fine!
(Caveat: I had some strange behaviour with whether it would run the gitlab instance correctly, but I’m not sure if that’s because of left-overs from a previous install attempt. Needs more testing!)