Automatic patching

Services being broken by automatically installing bad updates from the package manager is an issue that sysadmins have been mulling over for years. The knee-jerk reaction is to disable automatic updates, but this doesn’t avoid the problem. You still have to apply the updates sooner or later, and doing updates manually is ever more tedious as admins look after larger and larger fleets of virtual machines. Not patching at all is also not an option, for obvious security reasons and also for compliance with ISP-11 which mandates that security updates must be applied within 5 days.

The “gold standard” solution that everyone dreams of is to use a gated repo – i.e. you have a local “dirty” repo which syncs from upstream every night, and all of your dev/test machines update against this repo. Once “someone” has done “some” testing, they can allow the known-good updates into the clean repo, which the production machines update from. The trouble is, this is actually quite a lot of work to set up, and requires ongoing maintenance to test updates. It’s still very human-intensive, and sysadmins hate that.

So what else can be done? People often talk about a system where your dev servers patch nightly and your prod servers patch weekly, but this doesn’t help you if the broken update comes out on prod patching day.

We’ve recently started using a similar regime where dev/test servers patch nightly, but there’s a tweak with prod. All our prod servers are split into a class (dev, test, prod, etc) and one of three groups according to the numbers in their structured hostname. We classify nodes using a Puppet module called uob_classifier. Here’s an example:

[ispms@db-mariadb-p0 ~]$ sudo facter -p uob_service_class
prod
[ispms@db-mariadb-p0 ~]$ sudo facter -p uob_service_tier
1

Anything that for some reason slips through the automatic classification isn’t forgotten – the classifier assumes it is production group 1.

We then use these classes and groups to decide when to patch each type of box. Here’s the Puppet profile we use to manage yum updates with a Forge module, jgazeley/yumupdate.

# Profile for yum updates
class profile::yumupdate {

  # If it's prod, work out what day we should patch
  # to keep clusters patched on different days
  if ($::uob_service_class == 'prod') {
    $prodday = $::uob_service_tier ? {
      '1'     => ['1'],
      '2'     => ['2'],
      '3'     => ['3'],
      default => ['4'],
    }
  }

  # Work out what day(s) to patch for non-prod nodes
  $weekday = $::uob_service_class ? {
    'prod'  => $prodday,
    'dev'   => ['1-5'],
    'test'  => ['1-5'],
    'beta'  => ['1-5'],
    'demo'  => ['1-5'],
    default => ['1-5'],
  }

  # jgazeley/yumupdate
  class { '::yumupdate':
    weekday => $weekday,
  }
}

In our environment, production groups 1-3 patch on Mondays, Tuesdays or Wednesdays respectively. Anything that is designated production but somehow didn’t get a group number patches on Thursdays. Dev/test/etc servers patch every weekday.

We don’t know what day of the week patches will be released upstream, so this is still no guarantee that dev servers will install a particular patch before production. However it does mean that not all production servers will break on the same day if there is a bad update – we will have enough time to halt further updates if one server breaks due to a bad update.

It’s certainly not a perfect solution, but it avoids most of the risk surrounding automatic patching and is also very quick and simple to implement.

Getting to grips with GitLab CI

Background

Continuous Integration (CI) refers to the concept of automatically testing, building and deploying code as often as possible. This concept has been around in the world of software development for some time now, but it’s new to sysadmins like me.

While the deliverables produced by developers might be more tangible (a mobile app, a website, etc), with the rise of infrastructure as code, sysadmins and network admins are increasingly describing the state of their systems as code in a configuration management system. This is great, as it enables massive automation and scaling. It also opens the door for a more development-like workflow, including some of the tools and knowledge used by developers.

This article describes our progress using a CI workflow to save time, improve quality and reduce risk with our day-to-day infrastructure operations.

Testing, testing…

The Wireless team have used the Puppet configuration management system for several years, for managing server infrastructure, deploying applications and the suchlike. We keep our code in GitLab and do our best to follow best practice when branching/merging. However, one thing we don’t do is automatic testing. When a branch is ready for merging we test manually by moving a test server into that Puppet environment, and seeing if it works properly.

GitLab CI

The IT Services GitLab server at git.services.bristol.ac.uk now provides the GitLab CI service, which at its simplest is a thing that executes a script against your repository to check some properties of it. I thought I would start off simple and write some CI tests to be executed against our Puppet repo to do syntax checking. There are already tools that can do the syntax checking (such as puppet-lint), so all I need to do is write a CI test that executes them.

There’s a snag, though. What is going to execute these tests, and where? How are we going to ensure the execution environment is suitable?

GitLab CI runs on the GitLab server itself, but it executes CI tests in CI runners. Runners can be hosted on the GitLab server, on a different server or in the cloud. To start off simple, I created a new VM to host a single CI runner. So far so good, but the simplest possible runner configuration simply executes the CI tests in a shell on the system it is running on. Security concerns aside, this is also a bad idea because the only environment available is the one the runner is hosted on, and what if a CI test changes the state of the environment? Will the second test execute in the same way?

Docker

This is where Docker steps in. Docker is a container platform which has the ability to create and destroy lightweight, yet self-contained containers on demand. To the uninitiated, you could kind-of, sort-of think of Docker containers as VMs. GitLab CI can make use of Docker containers to execute CI tests. Each CI test is executed in a factory-fresh Docker container which is destroyed after the test has completed, so you can be sure of consistent testing, and it doesn’t matter if you accidentally break the container. The user can specify which Docker image to use for each test.

A real example

So far, this is all talk. Let me show you the components of the simple CI tests I’ve written for our Puppet control repo.

The CI config itself is stored in the root of your git repo, in a file called.gitlab-ci.yml. The presence of this file magically enables CI pipelines in your project. The file tells GitLab CI how to find a runner, which Docker image to use and what tests to execute. Let’s have a look at the config file we’re using for our Puppet repo:

# Docker image to use for these tests
image: git.services.bristol.ac.uk:4567/resnet/netops-ci:master

# Different stages in which to run tests. Only proceed to the
# next stage if the current one passes
stages:
  # check: syntax checking
  - check
  # style: linting
  - style

# Check Puppet syntax
puppet-parser:
  stage: check
  script:
    - tests/check-puppet-parser.sh
  only:
    - branches

# Check ERB template syntax
check-erb:
  stage: check
  script:
    - tests/check-erb.sh
  only:
    - branches

# Check YAML (Hiera) syntax
check-yaml:
  stage: check
  script:
    - tests/check-yaml.sh
  only:
    - branches

# Check Puppet linting style
puppet-lint:
  stage: style
  script:
    - tests/style-puppet-lint.sh
  only:
    - branches

All of the tests are executed in the same way: by calling shell scripts that are in the tests subdirectory of the repo. They have been sorted into two stages – after all, there’s no point in proceeding to run style checks if the syntax isn’t valid. Each one of these tests runs in its own Docker container without fear of contamination.

To give an idea of how simple these CI test scripts are, here’s the one we use to check Puppet syntax – it’s just a one-liner that finds all Puppet manifests in the repo and executes puppet parser validate against each one:

#!/bin/bash
set -euo pipefail

find . -type f -name '*.pp' -print0 | xargs -0 /opt/puppetlabs/bin/puppet parser validate

How CI fits with our workflow

In the configuration we are using, the test suite is executed against the codebase for every commit on every branch. It can also be configured only to run when tags are created, or only on the master branch, etc. For us, this decision is a reflection that we are using an interpreted language, there is no “build” stage and that every branch in the repo becomes a live Puppet environment.

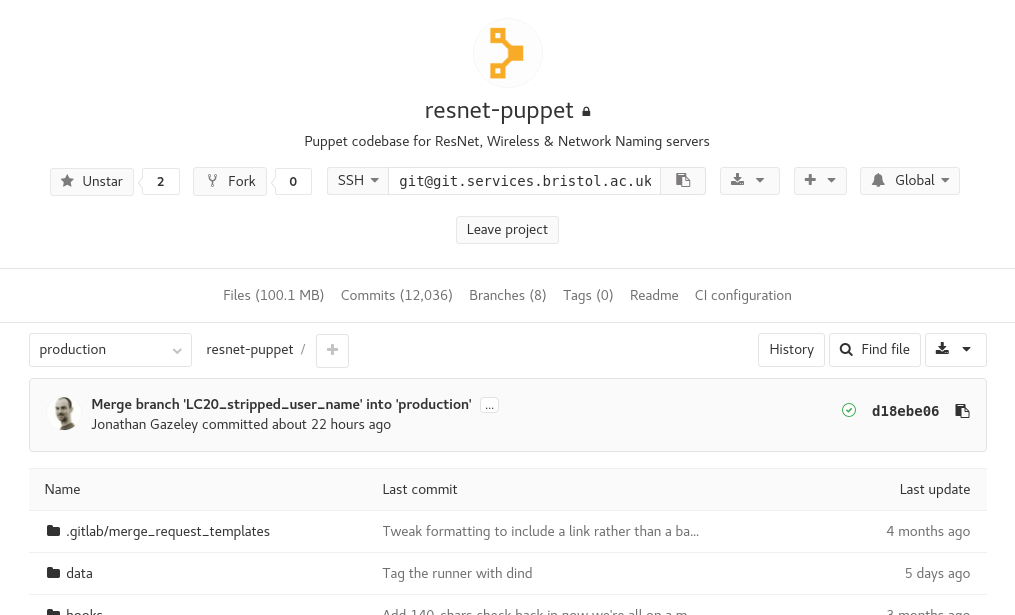
The tests are always run in the background and if they succeed, you get a little green tick at various places throughout the GitLab interface to show you that your commit, branch or merge request is passing (has passed the most recent test).

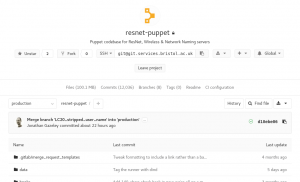
Project summary showing CI status OK

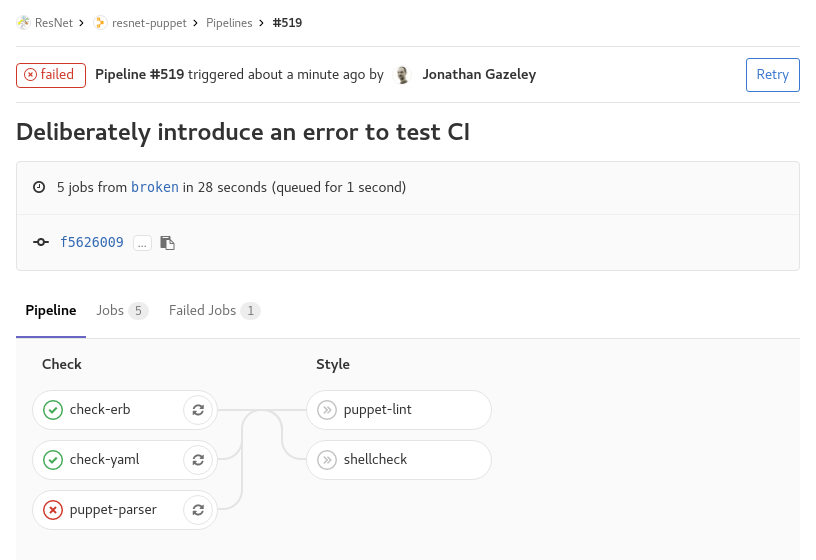
If, however, you push a bad commit that fails testing then you get an email, and all the green ticks turn to red crosses. You can drill down into the failed pipeline, see which specific tests failed, and what errors they returned.
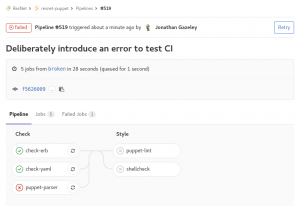
Failed tests

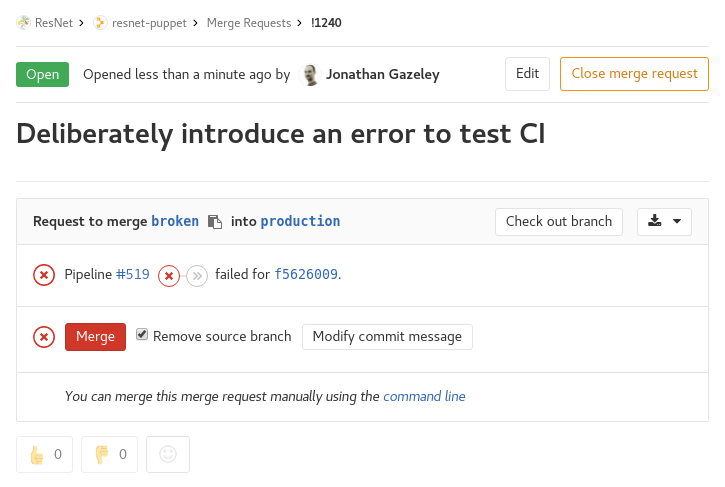
If you carry on regardless and create a merge request for a branch that is failing tests, it won’t let you accept that merge request without a dire warning.

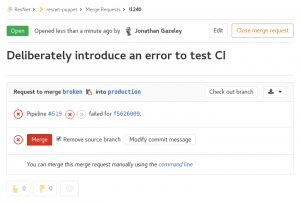
Merge request which failed CI tests

Combining the CI pipeline with setting your master or production branch to be a protected branch means it should be impossible to merge code that has syntax errors. Pretty cool, and a great way of decreasing risk when merging code to production.

I want to play!

Hopefully this article has shown how easy it is to get started running basic CI tests on GitLab CI with Docker. To make things even easier, I have created a repository of sample GitLab CI configs and tests. Have a wander over to the gitlab-ci repo and look at the examples I’ve shared. At the time of writing, there are are configs and tests suitable for doing syntax checks on Puppet configs, Perl/Python/Ruby/Shell scripts and Dockerfiles.

The repo is open to all IT Services staff to read and contribute to, so please do share back any useful configs and tests you come up with.

N.B At the time of writing, the GitLab CI service is provided by a small VM as a proof of concept so tests may be slow if too many people jump on this cool bandwagon. We are in the process of acquiring some better hardware to host CI runners.

As ever, we recommend all GitLab users join the #gitlab-users channel on Slack for informal support and service notifications.

Looking ahead

These CI tests are a simple example of using Docker containers to execute trivial tests and return nothing but an error code. In the future we will be looking to create more complex CI pipelines, including:

  • Functional tests, which actually attempt to execute the code and make sure it works as designed rather than just checking the syntax
  • Tests that return artefacts, such as a pipeline that returns RPMs after running rpmbuild to build them
  • Tests that deploy the end product to a live environment after testing it, rather than just telling a human operator that it’s safe to deploy

Service availability monitoring with Nagios and BPI

Several times, senior management have asked Team Wireless to provide an uptime figure for eduroam. While we do have an awful lot of monitoring of systems and services, it has never been possible to give a single uptime figure because it needs some detailed knowledge to make sense of the many Nagios checks (currently 2704 of them).

From the point of view of a Bristol user on campus here, there are three services that must be up for eduroam to work: RADIUS authentication, DNS, and DHCP. For the purposes of resilience, the RADIUS service for eduroam is provided by 3 servers, DNS by 2 servers and DHCP by 2 servers. It’s hard to see the overall state of the eduroam service from a glance at which systems and services are currently up in Nagios.

Nagios gives us detailed performance monitoring and graphing for each system and service but has no built-in aggregation tools. I decided to use an addon called Business Process Intelligence (BPI) to do the aggregation. We built this as an RPM for easy deployment, and configured it with Puppet.

BPI lets you define meta-services which consist of other services that are currently in Nagios. I defined a BPI service called RADIUS which contains all three RADIUS servers. Any one RADIUS server must be up for the RADIUS group to be up. I did likewise for DNS and DHCP.

BPI also lets meta-services depend on other groups. To consider eduroam to be up, you need the RADIUS group and the DNS group and the DHCP group to be up. It’s probably easier to see what’s going on with a screenshot of the BPI control panel:

BPI control panel

BPI control panel

So far, these BPI meta-services are only visible in the BPI control panel and not in the Nagios interface itself. The BPI project does, however, provide a Nagios plugin check_bpi which allows Nagios to monitor the state of BPI meta-services. As part of that, it will draw you a table of availability data.

eduroam uptime

eduroam uptime

So now we have a definitive uptime figure to the overall eduroam service. How many nines? An infinite number of them! 😉 (Also, I like the fact that “OK” is split into scheduled and unscheduled uptime…)

This availability report is still only visible to Nagios users though. It’s a few clicks deep in the web interface and provides a lot more information than is actually needed. We need a simpler way of obtaining this information.

So I wrote a script called nagios-report which runs on the same host as Nagios and generates custom availability reports with various options for output formatting. As an example:

$ sudo /usr/bin/nagios-report -h bpi -s eduroam -o uptime -v -d
Total uptime percentage for service eduroam during period lastmonth was 100.000%

This can now be run as a cron job to automagically email availability reports to people. The one we were asked to provide is monthly, so this is our crontab entry to generate it on the first day of each month:

# Puppet Name: eduroam-availability
45 6 1 * * nagios-report -h bpi -s eduroam -t lastmonth -o uptime -v -d

It’s great that our work on resilience has paid off. Just last week (during the time covered by the eduroam uptime table) we experienced a temporary loss of about a third of our VMs, and yet users did not see a single second of downtime. That’s what we’re aiming for.

Merging SELinux policies

We make extensive use of SELinux on all our systems. We manage SELinux config and policy with the jfryman/selinux Puppet module, which means we store SELinux policies in plain text .te format – the same format that audit2allow generates them in.

One of our SELinux policies that covers permissions for NRPE is a large file. When we generate new rules (e.g. for new Nagios plugins) with audit2allow it’s a tedious process to merge the new rules in by hand and mistakes are easy to make.

So I wrote semerge – a tool to merge SELinux policy files with the ability to mix and match stdin/stdout and reading/writing files.

This example accepts input from audit2allow and merges the new rules into an existing policy:

cat /var/log/audit/audit.log | audit2allow | semerge -i existingpolicy.pp -o existingpolicy.pp

And this example deduplicates and alphabetises an existing policy:

semerge -i existingpolicy.pp -o existingpolicy.pp

There are probably bugs so please do let me know if you find it useful and log an issue if you run into problems.

One year of ResNet Gitlab

Today, it has been one year since the first Merge Request (MR) was created and accepted by ResNet* Gitlab. During that time, about 250 working days, we have processed 462 MRs as part of our Puppet workflow. That’s almost two a day!

We introduced Git and Gitlab into our workflow to replace the ageing svn component which didn’t handle branching and merging well at all. Jumping to Git’s versatile branching model and more recently adding r10k into the mix has made it trivially easy to spin up ephemeral dev environments to work on features and fixes, and then to test and release them into the production environment safely.

We honestly can’t work out how on earth we used to cope without such a cool workflow.

Happy Birthday, ResNet Gitlab!

* 1990s ResNet brand for historical reasons only – this Gitlab installation is used mostly for managing eduroam and DNS. Maybe NetOps would have been a better name 🙂

Rethinking the wireless database architecture

The eduroam wireless network has a reliance on a database for the authorization and accounting parts of AAA (authentication, authorization and accounting – are you who you say you are, what access are you allowed, and what did you do while connected).

When we started dabbling with database-backed AAA in 2007 or so, we used a centrally-provided Oracle database. The volume of AAA traffic was low and high performance was not necessary. However (spoiler alert) demand for wireless connectivity grew and before many months, we were placing more demand on Oracle than it could handle. The latency of our queries was taking sufficiently long that some wireless authentication requests would time out and fail.

First gen – MySQL (2007)

It was clear that we needed a dedicated database platform, and at the time that we asked, the DBAs were not able to provide a suitable platform. We went down the route of implementing our own. We decided to use MySQL as a low-complexity open source database server with a large community. The first iteration of the eduroam database hardware was a single second-hand server that was going spare. It had no resilience but was suitably snappy for our needs.

First gen database

First gen database

Second gen – MySQL MMM (2011)

Demand continued to grow but more crucially eduroam went from being a beta service that was “not to be relied upon” to being a core service that users routinely used for their teaching, learning and research. Clearly a cobbled-together solution was no longer fit for purpose, so we went about designing a new database platform.

The two key requirements were high query capacity, and high availability, i.e. resilience against the failure of an individual node. At the time, none of the open source database servers had proper clustering – only master-slave replication. We installed a clustering wrapper for MySQL, called MMM (MySQL Multi Master). This gave us a resilient two-node cluster whether either node could be queried for reads and one node was designated the “writer” at any one time. In the event of a node failure, the writer role would be automatically moved around by the supervisor.

Second gen database

Second gen database

Not only did this buy us resilience against hardware faults, for the first time it also allowed us to drop either node out of the cluster for patching and maintenance during the working day without affecting service for users.

The two-node MMM system served us well for several years, until the hardware came to its natural end of life. The size of the dataset had grown and exceeded the size of the servers’ memory (the 8GB that seemed generous in 2011 didn’t really go so far in 2015) meaning that some queries were quite slow. By this time, MMM had been discontinued so we set out to investigate other forms of clustering.

Third gen – MariaDB Galera (2015)

MySQL had been forked into MariaDB which was becoming the default open source database, replacing MySQL while retaining full compatibility. MariaDB came with an integrated clustering driver called Galera which was getting lots of attention online. Even the developer of MMM recommended using MariaDB Galera.

MariaDB Galera has no concept of “master” or “slave” – all the nodes are masters and are considered equal. Read and write queries can be sent to any of the nodes at will. For this reason, it is strongly recommended to have an odd number of nodes, so if a cluster has a conflict or goes split-brain, the nodes will vote on who is the “odd one out”. This node will then be forced to resync.

This approach lends itself naturally to load-balancing. After talking to Netcomms about the options, we placed all three MariaDB Galera nodes behind the F5 load balancer. This allows us to use one single IP address for the whole cluster, and the F5 will direct queries to the most appropriate backend node. We configured a probe so the F5 is aware of the state of the nodes, and will not direct queries to a node that is too busy, out of sync, or offline.

Third gen database

Third gen database

Having three nodes that can be simultaneously queried gives us an unprecedented capacity which allows us to easily meet the demands of eduroam AAA today, with plenty of spare capacity for tomorrow. We are receiving more queries per second than ever before (240 per second, and we are currently in the summer vacation!).

We are required to keep eduroam accounting data for between 3 and 6 months – this means a large dataset. While disk is cheap these days and you can store an awful lot of data, you also need a lot of memory to hold the dataset twice over, for UPDATE operations which require duplicating a table in memory, making changes, merging the two copies back and syncing to disk. The new MariaDB Galera nodes have 192GB memory each while the size of the dataset is about 30GB. That should keep us going… for now.

Integrating Puppet and Git

Introduction

One of the main benefits of working with Git is the ability to split code into branches and work on those branches in parallel. By integrating your Git branches into your Puppet workflow, you can present each Git branch as a Puppet environment to separate your dev, test and prod environments in different code branches.

This guide assumes you already have a working Puppet master which uses directory environments, and a working Gitlab install. It assumes that your Puppet and Gitlab instances are on different servers. It’s recommended that you install Gitlab with Puppet as I described in a previous blog post.

Overview

The basic principle is to sync all Puppet code from Gitlab to Puppet, but it’s a little more complex than this. When code is pushed to any branch in Git, a post-receive hook is executed on the Gitlab server. This connects via ssh to the Puppet master and executes another script which checks out the code from the specific Git branch into a directory environment of the same name.

Deploy keys

First you need to create a deploy key for your Puppet Git repo. This grants the Puppet master read-only access to your code. Follow these instructions to create a deploy key. You’ll need to put the deploy key in the home directory of the puppet user on your Puppet master, which is usually /var/lib/puppet/.ssh/id_rsa.pub.

Puppet-sync

The puppet-sync script is the component on the Puppet master. This is available from Github and can be installed verbatim into any path on your system. I chose /usr/local/bin.

SSH keys

You’ll need to create a pair of SSH public/private keys to allow your Gitlab server to ssh to your Puppet server. This is a pretty standard thing to do, but instructions are available on the README for puppet-sync.

Post-receive hook

The post-receive hook must be installed on the Gitlab server. The source code is available from Github. You will need to modify the hook to point at the right locations. The following values are sensible defaults.

REPO="git@gitlab.yoursite.com:namespace/puppet.git"
DEPLOY="/etc/puppet/environments"
SSH_ARGS="-i /var/opt/gitlab/.ssh/git_id_rsa"
PUPPETMASTER="puppet@puppet.yoursite.com"
SYNC_COMMAND="/usr/local/bin/puppet-sync"

If you are using the spuder/gitlab Puppet module to manage your Gitlab instance, installing a custom hook is as simple as doing:

gitlab::custom_hook { 'puppet-post-receive':
  namespace => 'namespace',
  project   => 'puppet',
  type      => 'post-receive',
  source    => 'puppet:///modules/site_gitlab/puppet-post-receive',
}

If you installed Gitlab by hand, you’ll need to do manually install the hook into the hooks subdirectory in your raw Git repo. On our Gitlab installation, this is in /var/opt/gitlab/git-data/repositories/group/puppet.git/hooks

Workflow

Now all the components are in place, you can start to use it (when you’ve tested it). Gitlab’s default branch is called master whereas Puppet’s default environment is production. You need to create a new branch in Gitlab called production, and set this to be the default branch. Delete master.

  1. Make new feature branches on the Gitlab server using the UI
  2. Use git pull and git checkout to fetch these branches onto your working copy
  3. Make changes, commit them, and when you push them, those changes are synced to a Puppet environment with the same name as the branch
  4. Move a dev VM into the new environment by doing puppet agent -t --environment newfeature
  5. When you’re happy, send a merge request to merge your branch back into production. When the merge request is accepted, the code will automatically be pushed to the Puppet server.

Read about this in more detail: Gitlab Flow.

Packaging mod_auth_cas for CentOS 7

Mark wrote a useful post about building mod_auth_cas for CentOS 7. It works, but I prefer to build RPM packages on a build server and deploy them to production servers, rather than building on production servers.

Basically I took the spec file from the mod_auth_cas source package for CentOS 6 from the EPEL 6 repository, tweaked it, and replaced the source tarball with the forked copy Mark recommended. This built cleanly for CentOS 7.

I’ve sent a pull request back to the upstream project with the Red Hat build files and documentation and for those who are keen, here are the EL7 RPM and source RPM:

Update

There’s an even better way of building this for CentOS 7. Fedora 21 includes Apache 2.4 and mod_auth_cas and it is really easy to backport this source package.

First grab the latest version of the source package from the Fedora mirror onto your CentOS 7 build server. Always make sure there isn’t a newer version available in the updates repo.

Rebuild is as simple as issuing:

rpmbuild --rebuild mod_auth_cas-1.0.8.1-11.fc22.src.rpm

It will spit out an RPM file suitable for deployment on CentOS 7. Add --sign if you routinely sign your packages with an RPM-GPG key.

Using Puppet to deploy code from Git

I’ve revisited the way that we at ResNet deploy our web applications to web servers. We decided to store the application code in a Git repository. As part of our release process, we create a tag in Gitlab.

Rather than check the code out manually, we are using a Forge module called puppetlabs/vcsrepo to clone a tagged release and deploy it. Our app repos do not permit anonymous cloning so the Puppet deployment mechanism must be able to authenticate. I found the documentation for puppetlabs/vcsrepo to be a bit lacking and had spend a while figuring out what to do to make it work properly.

I recommend you generate a separate SSH key for each app you want to deploy. I generated my key with ssh-keygen and added it to Gitlab as a deploy key which has read-only access to the repo – no need to make a phantom user.

Here’s a worked example with some extra detail about how to deploy an app from git:

# Define docroot
$docroot = '/var/www/app'

# Deploy SSH key to authenticate git
file { '/etc/pki/id_rsa':
  source => 'puppet:///modules/app/id_rsa',
  owner  => 'root',
  group  => 'root',
  mode   => '0600',
}
file { '/etc/pki/id_rsa.pub':
  source => 'puppet:///modules/app/id_rsa.pub',
  owner  => 'root',
  group  => 'root',
  mode   => '0644',
}

# Clone the app from git
vcsrepo { 'app':
  ensure   => present,
  path     => $docparent,
  provider => git,
  source   => 'git@gitlab.resnet.bris.ac.uk:resnet/app.git',
  identity => '/etc/pki/git_id_rsa',
  revision => '14.0.01',
  owner    => 'apache', # User the local clone will be created as
  group    => 'apache',
  require  => File['/etc/pki/id_rsa', '/etc/pki/id_rsa.pub'],
}

# Configure Apache vhost
apache::vhost { 'app'
  servername    => 'app.resnet.bris.ac.uk',
  docroot       => $docroot,
  require       => Vcsrepo['app'],
  docroot_owner => 'apache',  # Must be the same as 'owner' above
  docroot_group => 'apache',
  ...
}

To deploy a new version of the app, you just need to create a new tagged release of the app in Git and update the revision parameter in your Puppet code. This also gives you easy rollback if you deploy a broken version of your app. But you’d never do that, right? 😉

Publish a Module on Puppet Forge

I’ve started publishing as many of my Puppet modules as possible on Puppet Forge. It isn’t hard to do but there are a few things to know. This guide is largely based on Puppetlabs’ own guide Publishing Modules on the Puppet Forge.

  1. For home-grown modules that have grown organically, you are likely to have at least some site-specific data mixed in with the code. Before publishing, you’ll need to abstract this out. I recommend using parametrised classes with sane defaults for your inputs. If necessary, you can have a local wrapper class to pass site-specific values into your module.
  2. The vast majority of Puppet modules are on GitHub, but this isn’t actually a requirement. GitHub offers public collaboration and issue tracking, but you can keep your code wherever you like.
  3. Before you can publish, you need to include some metadata with your module. Look at the output of puppet module generate. If you’re starting from scratch, this command is an excellent place to start. If you’re patching up an old module for publication, run it in a different location and selectively copy the useful files into your module. The mandatory files are metadata.json and README.md.
  4. When you’re ready to publish, run puppet module build. This creates a tarball of your module and metadata which is ready to upload to Puppet Forge.
  5. Create an account on Puppet Forge and upload your tarball. It will automatically fill in the metadata.
  6. Install your module on your Puppetmaster by doing puppet module install myname/mymodule