Making the Juniper VPN Client work…

As well as the 32bit rpm version of the Linux client, Juniper have a browser based Java applet for all OSes – which also works on Linux.

It’s not as pretty as the windows/mac client, but it can be made to work – and if you rummage around in it enough it contains a non-java executable at its core which may be useful as the basis of a homebrew non-java application.

Caveats:
This blog post describes a way to get connected to the new UoB vpn using a linux client.  It’s not tested enough, or foolproof enough to qualify as “official” documentation.  It’s more a record of “what I did to make it work”.

We’ve still got a fair way to go before we can publish any of this fully alongside the other instructions.

So try it, if it works for you great! Let us know in the comments!  If I’ve got something wrong, or you’ve worked around one of the problems I hit, let us know in the comments!

If it doesn’t work for you we’d like to hear about that too, but asking for help via the bris-linux mailing list or the IRC channel is probably going to be more productive than asking in the comments.

Ubuntu 12.04 and 12.10 (64bit)
The GUI for the vpn client is a 32bit Java application.  Ubuntu doesn’t appear to install java at all as part of the base install.  So if you’re starting from a point where you have no java support at all, it’s fairly straight forward:

 sudo apt-get install icedtea-7-plugin openjdk-7-jre:i386

The icedtea-7-plugin package will pull in the 64bit version of Java as a dependency, and the 64bit version is chosen by preference.  You can change this by running:

sudo update-alternatives --config java

And select the 32bit version from the list.

At this point, you’ve got 32bit java installed and selected as your default version of java.  You also have the icedtea java plugin for 64bit web browsers installed.

Now point your web browser at https://uobnet.bris.ac.uk and sign in using your UoB username and password.  When the page loads, you should see a line which says “Network Connect” – click the Start button.

You’ll probably get a popup warning saying that you need to make sure you’ve got all the required 32bit libraries installed.  You have (we’ve just done that!) so click “Yes”  – you’ll also get a couple of popups asking if you’re sure you trust the certificate the application was signed with

The first time you run Network Connect it will pop up a terminal window and ask you to put in your (local) sudo password.  This is because the underlying vpn widget needs to run as root, and this popup will setuid the binary so you don’t need to sudo every time you connect.

NetworkConnect

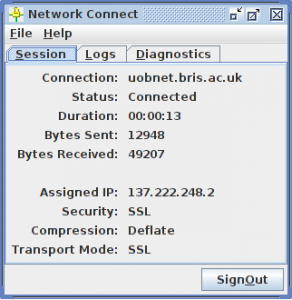
With a bit of luck and a following wind, you’ll get an ugly box pop up which says you’re connected!

Fedora/RedHat/CentOS/ScientificLinux
I haven’t tested any of these, but as far as I can tell, doing this would probably work:

sudo yum install java-1.7.0-openjdk.i386 icedtea-web.i386

Then follow the rest of the Ubuntu instructions

I don’t want Java in my Browser!
Neither do I to be honest. I have the plugin disabled most of the time and enable it only when I want to connect to the VPN.

The version of the client which Juniper distribute as an rpm appears to be a packaged version of the java client which you can load from the browser as described above.

As yet, I’ve not had a chance to do any testing of the rpm version.  Details of that will follow in later posts…

I don’t want Java at all!
As far as I can tell, Java is only required for the GUI. It’s a wrapper around a 32bit binary executable which could be called from the command line (or wrapped in a non-java GUI or script I suppose)

I haven’t managed to find the right magic incantation to get it to actually build a VPN tunnel yet, but this is where I’ve got to so far:

  1. Download the java applet by going to https://uobnet.bris.ac.uk/dana-cached/nc/ncLinuxApp.jar If it asks you to log in, do so using your UoB username and password
  2. Unpack the archive with
    unzip ncLinuxApp.jar
  3. That should give you a folder full of files, which we need to go into:
    cd ncLinuxApp
  4. There’s a helper script we need to run first, which grabs the SSL certificate in use by the VPN connection.  Run it like this:
    bash ./getx509certificate.sh uobnet.bris.ac.uk uobnet.crt
  5. The binary which actually builds the tunnel is “ncsvc” which is a 32bit executable.  It appears to require 3 packages on Ubuntu:
    sudo apt-get install libc6-i386 lib32z1 lib32nss-mdns

However, at that point I’m stuck.  It looks very much like you should be able to build a tunnel by making ncsvc setuid and then calling it with the appropriate parameters:

sudo chown root ncsvc
sudo chmod +s ncsvc
...

Unfortunately I can’t make it work

I’ve made it work!  See this followup blog post for details.

I don’t like closed source binaries either..
As Ian has mentioned previously, We’ve not managed to get the network-manager-vpnc client to connect at all.  We’ll probably come back to that after prodding at rpms, but in the mean time, if you manage to make it work please let us know!

Further Reading
Most of the above is information culled from the following links.  They may be helpful if you fancy having a prod at this yourself.

Some of those links contain perl script wrappers for ncsvc, but as I’ve not had a chance to read every line of that code to make sure it’s not malicious in any way I really can’t recommend you use them!

Linux and the UoB VPN

The University of Bristol has had a VPN service for at least 11 years now, and although the hardware has had a few upgrades in that time the service is essentially running in the same form, using the same old technology.

Time has moved on, and the old VPN service needs replacing so that we can bring its support level up to where we want it.

We’ve procured a VPN appliance from Juniper, and this meets the needs of the majority of Windows, OSX, iPhone and Android users (and meets those needs much better than the old service ever has done.)

Unfortunately there are a few “wrinkles” in Juniper’s Linux client support.

Juniper Client
Juniper do distribute a Linux client.  It’s packaged as an RPM suitable for RedHat Enterprise (or derivatives such as CentOS or Scientific Linux) and is 32bit only. Which is fine, if that’s what you’re using!

If you’re using a Debian derived distribution (Debian, Ubuntu, Mint etc) or a 64bit OS, then it’s not so great.

Various workarounds which will get that 32bit RPM installed on a 64bit Ubuntu (or whatever) seem to be available according to google, but we’ve not had the resources available through the summer to test or document them. Work is now tenatively beginning…

Network Manager

Most linux distributions come with Network Manager these days, and on most of those distributions you can get the “network-manager-vpnc” plugin, which claims to be “compatible with various Cisco, Juniper, Netscreen, and Sonicwall IPSec-based VPN gateways”.

This would seem to be the ideal solution (as it’s built in, doesn’t have any 32 bit dependencies etc) unfortunately we haven’t managed to make it work yet. Discussions with Juniper suggest that this may be caused by a bug in the way they talk to our AD, with a possible fix coming out later in the year, but this is yet to be proven.

That’s not great either, so we need some coping strategies…

Plans B, C, etc…
In the short term, we’re going to keep the old VPN service around so that linux clients still have a way to connect in remotely until we can come up with something better.

We would welcome you to try getting the 32-bit client installed on the distribution of your choice. If anyone makes any progress with that before we’ve had a chance to, please let us know!  Any testing we do will initially result in more blog posts here, and eventually some proper documentation (and hopefully some wrapper scripts/installers if we can get that working)

In the longer-term, we’d obviously like Juniper to release 64bit binary packages (and .debs!) We’re in contact with Juniper about their roadmap and release cycle and will be re-evaluating all of the above options as & when more information becomes available…

** STOP PRESS ** We have managed to make a 64bit Ubuntu machine successfully connect to the VPN. Details will be in a follow-up post.

How to use SELinux

SELinux is one of the least well understood components of modern Linux distributions. Search any forum or mailing list and you are likely to find recommendations to switch it off because it “breaks things”. When we decided to migrate the ResNet and eduroam servers from CentOS 5 to 6, we took the decision to move from “SELinux off by default” to “SELinux on by default, and only off where necessary”. Turns out it’s not that hard to configure 🙂

Introduction

Explaining exactly how SELinux works is beyond the scope of this blog post – but suffice it to say that it works by labelling parts of the filesystem, users and processes with a context to say what they are for. It will then block actions it thinks are unsafe – for example, even if your httpd has filesystem permissions to write to /etc/ssh/, by default SELinux would block this action because it isn’t usual. To learn more, have a look at the many web pages about SELinux.

Configuring SELinux

Configuring SELinux to work nicely on your system is best described as “training” it, and is a lot like training a spam filter. You have to look at the SELinux audit log to see what actions were blocked, review them, and then add them to a whitelist by loading a new policy. You can load as many supplementary policies as you need.

Your SELinux installation should always be left in enforcing mode by default. Edit /etc/selinux/config to make sure it is enforcing, but be aware that this needs a reboot to take effect.

# /etc/selinux/config
SELINUX=enforcing
SELINUXTYPE=targeted

When you want to temporarily enable permissive mode, issue the command sudo setenforce 0. This takes effect immediately. Don’t forget to run sudo setenforce 1 to re-enable enforcing mode after you’ve finished debugging.

When you start out configuring SELinux, it’s important to run it in permissive mode, rather than enforcing mode. Let’s say you want to debug an application that wants to perform operations A, B and C, which would all be blocked by SELinux. In permissive mode, the application would be allowed to run, and SELinux logs what it would have blocked had it been in enforcing mode. Operations A, B and C are all logged and can then be added to the policy. In enforcing mode, the application tries operation A, is blocked and often doesn’t even bother trying operations B and C – so they are never logged, and cannot be debugged.

Capturing SELinux audit logs and generating a policy

All SELinux operations are stashed in the audit log, which is in /var/log/audit/audit.log on CentOS by default. The audit log is not hugely easy to read by eye, but you can install the package policycoreutils-python which provides some handy analysis tools.

Assuming you’ve already dropped SELinux into permissive mode, now try executing the operations you wish to debug: might be testing a Nagios plugin, running a new application, or something else. It should succeed as SELinux is permissive, but it will log all the things it would otherwise have blocked.

Run this command, grepping for the process you’re interested in to generate a policy file to grant all those accesses. Be aware of namespacing issues. SELinux comes with a bunch of bundled policies which are called things like nagios and httpd. If you are loading supplementary policies for these things, it’s best to add a prefix like resnet-nagios or sysops-nagios. The default file extension for a text-mode policy is .te.

sudo cat /var/log/audit/audit.log | grep nagios | audit2allow -m resnet-nagios > resnet-nagios.te

Your .te file is more-or-less human readable and you should inspect it to make sure your new policy isn’t going to allow anything bad. Here’s the .te file I generated by running the above command on my Nagios server:

module resnet-nagios 1.0;

require {
  type nagios_system_plugin_t;
  type nagios_t;
  type tmp_t;
  type initrc_tmp_t;
  type nagios_services_plugin_t;
  class file { read ioctl write getattr open append };
}

#============= nagios_services_plugin_t ==============
allow nagios_services_plugin_t tmp_t:file append;

#============= nagios_system_plugin_t ==============
allow nagios_system_plugin_t tmp_t:file append;

#============= nagios_t ==============
allow nagios_t initrc_tmp_t:file { read write getattr open ioctl };
#!!!! The source type 'nagios_t' can write to a 'file' of the following types:
# nagios_var_run_t, nagios_log_t, nagios_tmp_t, root_t

allow nagios_t tmp_t:file { write ioctl read open getattr append };

Loading a custom SELinux policy by hand

Now that we’ve come up with a text-based SELinux policy, it needs to be converted into a binary policy that can be loaded. The command is very similar but note the capital M rather than lower case, which makes it write out a binary policy which has a .pp extension (not to be confused with Puppet manifests ;))

sudo cat /var/log/audit/audit.log | grep nagios | audit2allow -M resnet-nagios

Once you’ve got your binary SELinux module, loading it by hand is easy:

sudo semodule -i resnet-nagios.pp

The CentOS wiki page on SELinux is handy for manipulating policies manually.

Loading a custom SELinux policy with Puppet

There are Puppet modules available which handle the compiling and loading of modules automatically – you just need to provide the .te file and it will handle the rest. For the ResNet and eduroam servers, we are using James Fryman’s puppet-selinux module. It’s not necessarily the best but it was the most appropriate for us at the time we took the decision over a year ago and has worked solidly – other modules are also available. Here’s how we’re using it:

include selinux
if $::osfamily == 'RedHat' {
  selinux::module { 'resnet-nagios':
    ensure => 'present',
    source => 'puppet:///modules/nagios/resnet-nagios.te',
  }
}

Summary

That’s more or less it! It’s easy to set SELinux in permissive mode, capture output and create your own policies. There really is no excuse not to be using it 😉

I hope this article has been useful. If you’re a member of UoB and you want to talk about SELinux or Puppet, grab me on the #uob-unix IRC channel. I’m dj_judas21.

Forcing cssh to use IPv4

csshThe majority of the servers I look after are managed by puppet[1], but we have a suite of 10 older servers which fall outside of that management environment.

We’re slowly replacing them with Shiny! New! Managed! Servers! ™ but until we’ve completed that work we’re stuck with limited management tools, doing things manually at the command line, like it’s still the 20th century[2]

Occasionally we need to do the same thing on every server (eg kick off a “yum update” or whatever) and using ssh to connect to them all one at a time is tedious.

So, we use cssh which is a scary… dangerous… “powerful” tool that spawns a load of ssh sessions and allows you to send the same keypresses to all the servers at once.  I don’t like using it, it feels like a really dirty way to admin a bunch of hosts, but sometimes it’s a necessary evil.

As long as you’re careful what you type, and don’t do anything daft like “sudo bash” then you can keep a lid on the fear.

One of the “features” of this bundle of 10 servers is that they’re dual stack IPv4 and IPv6, but ssh is only accepting connections on the IPv4 address.

If you’re connecting to these one at a time, “ssh -4 server.name.bris.ac.uk” will sort that out for you, but it took a little more rummaging in man pages to come up with the cssh alternative, and that’s the real purpose of this post.

Todays Tip
To force cssh to use IPv4 when connecting to a bunch of hosts, use:

cssh --options="-o AddressFamily=inet" <host list>

[1] Other config management systems are available 🙂
[2] To be fair, sometimes it’s also useful to kick off a puppet run everywhere

Signing RPM packages

RPM signingI’m sure many Linux sysadmins around the university build RPMs to ease the deployment of software to RedHat-a-like systems. But how many people sign them? Signing is important to make sure your boxes are getting the packages you’re expecting, and allows smoother installation on the box itself. I’ve written a few notes about what we do in the ResNet NetOps team in case they are useful to anyone else. These are loosely based upon some notes hidden in the depths of the ResNet wiki.

Setting rpmbuild up to sign

Before you can sign packages, you need to set up your signing key. There is one key per repo, not per repo maintainer (apparently this is different from apt – I dunno, I’m an RPM guy!). There’s no point in re-inventing the wheel, so use these instructions to get set up with your signing key.

Signing your own packages

If you build your packages either from specfile and tarball, or by rebuilding a source rpm, signing is easy. At the time you build your package, just add the --sign option to sign the RPM with your key. There’s no need to specify whom to sign the package as, because your ~/.rpmmacros file specifies this.

rpmbuild -ba --sign source-1.0.spec
rpmbuild --rebuild source-1.0.srpm

Re-signing someone else’s packages

Often, you’ll need to drag someone else’s third-party RPM into your repo for easy deployment. All the RPMs in your repo should be signed with the same key, regardless of original source. You can sign existing RPMs like this:

rpm --resign package-1.0.rpm