Juniper VPN – official Linux instructions

After much effort, we now have a packaged version of the Juniper VPN Linux client available! We also have a helper script which allows you to easily connect from your Linux desktop. It’s available for rpm and deb based distros, and as a tgz if you’re using a different package manager.

The instructions have been published here: http://www.bris.ac.uk/it-services/advice/homeusers/uobonly/uobvpn/howto/linux/

The old PPTP based VPN will be switched off on the 30th June 2014 and anyone using linux to VPN in will need to migrate to the new service before then.

-Paul

Moving a Rocks 6 cluster and changing the IP address of the head node

We have a Rocks 6 cluster which was definitely out-growing the server room/air-conditioned broom-cupboard in which it was housed, in terms of cooling, power consumption and a growing lack of physical space.
There were also many new nodes which wanted to be added but couldn’t without considerable upgrades to the room or a move to a more suitable space.

Moving it to a better home meant a change of upstream router and hence a change of IP address. All signs pointed to this being a terrible idea and a potential disaster, and all replies to related questions on the Rocks mailing list said that reinstalling the head node was the only viable solution. (Possibly using a “restore roll”)

We weren’t convinced that it would be less effort (or time taken) to reinstall than hack the config…

Internally others had moved IP and changed the hostname of a Rocks 5 cluster and had a long, long list of changes required. This was clearly going to be error-prone and looked like a worse idea than initially.

But then we found a page which claimed it was only a few “rocks set” commands and that’s all that was needed on Rocks 6!
( see http://davidmnoriega.wordpress.com/2012/06/22/rocks-cluster-changing-the-external-ip-address/ )

It did mention that there would be a couple of files in /etc to change too, but didn’t explicitly list everything.

Testing on VMs before the move…
We set about installing a VM on Virtualbox as a test head node, just with a default Rocks 6 config from the same install image which was used for the cluster (Rocks 6.0 “Mamba”). We then made a couple of compute node VMs for it to install and set about testing whether changing the IP using those instructions works fine.

First snag: VirtualBox Open-Source Edition doesn’t allow PXE boot from Intel ethernet adapters, because there is some non-GPL-compatible code which cannot be bundled in with it (ref: https://forums.virtualbox.org/viewtopic.php?f=9&t=34681 ).

Just pick a non-intel network adapter for the compute nodes and all is fine with the PXE boot, once the right boot order is set (PXE then HDD).

To ensure that we caught all references to the IP address, we used this:

find /etc -type f -print0 | xargs -0 grep a.b.c

..where a.b.c is the first three octets of the IP address as this is a /24 subnet we’re part of.
(This might be a bit more complicated if your subnet isn’t a /8, /16 or /24)

This finds:
/etc/sysconfig/network
/etc/sysconfig/network-scripts/ifcfg-em2
/etc/sysconfig/static-routes
/etc/yum.repos.d/Rocks-6.0.repo
/etc/hosts

Likewise we searched /opt as well as /etc, as the maui config and a couple of other bits and bobs are stored there; we found nothing which needed changing in /opt.

Then simply :

  • change all these IPs to the updated one (including changing static gateways)
  • run the few “rocks set” commands to update the ethernet interface and kickstart settings :


    rocks set host interface ip xxxxxxx ethX x.x.x.x
    rocks set attr Kickstart_PublicAddress x.x.x.x
    rocks set attr Kickstart_PublicNetwork x.x.x.x
    rocks set attr Kickstart_PublicBroadcast x.x.x.x
    rocks set attr Kickstart_PublicGateway x.x.x.x
    rocks set attr Kickstart_PublicNetmask x.x.x.x

  • physically move everything
  • (re)start the head node
  • rebuild all the nodes with:
    rocks set host boot compute action=install and (re)boot the nodes.
    They need this to point at the newly-configured head node IP, as it uses the external IP for static routing. (No idea why it doesn’t use the internal IP, but that’s for another post…)

And everything worked rather nicely!
This was then repeated on the physical machines with renewed confidence that it would work just fine.

Remember to check that everything is working at this point — submit jobs to the queues, ensure NFS is happy and that the nodes can talk to the required external services such as licence servers.

Problems encountered and glossed over by this:

  • Remember to make the configuration changes before you move the head node, otherwise it can take an age to boot whilst it times out on
    remote NFS mounts and other network operations
  • Ensure you have all sockets enabled (network and power) for the racks you are moving to, otherwise this could add another unwanted delay
  • Physically moving machines requires a fair bit of downtime, a van and some careful moving to avoid damage to disks (especially the head node)
  • Networking in the destination room was not terribly structured, and required us to thread a long cable between the head node and internal
    switch, as the head node is in a UPS’d rack which is the opposite side of the (quite large) room to the compute nodes. This will be more of a pain if any compute nodes need to also be on UPS (e.g. they
    have additional storage).
  • Don’t try to be optimistic on the time it will take — users will be happier if you allocate 3 days and it takes 2 than if you say it will take 1 and it takes 2.
  • Don’t have just broken your arm before attempting to move a cluster — it makes moving nodes or doing cabling rather more awkward/impossible! (Unlikely to be a problem for most people 🙂

What’s talking to my DNS server?

I currently look after 6 DNS resolvers, which are used to provide DNS two large sections of the university network.

While they’re all running BIND, there’s a real mix of versions so I want to consolidate them down, retire the oldest pair and generally tidy up.

The two oldest are in an IP address range that I can’t easily move onto any of the other servers, so any clients using them need to be pointed at the newer servers before I can retire them.

The problem is, I’m not 100% sure which clients are using them.

So, how do you find out what machines are using a given DNS server?
The temptation is to turn on querylogging, and then look at the log files after a week. There are two problems with that, the first is a technical issue (querylogging appears to block responses while waiting for the logging IO to happen, slows your DNS server down significantly and sends the load average through the roof) but the second (more important) problem is a privacy issue.

Querylogging logs every DNS request made by your clients, as well as the IP the client machine is using. Taken together, those two pieces of information are enough to identify what a given user is looking at on the internet. That’s a pretty serious breach of privacy, needs signoff from on-high and is generally a world of paperwork and hastle which is best avoided.

So we need an approach which is lightweight, and only identifies the machines which are talking to us and not what they’re asking for. Gathering the minimum of data required to allow us to make the decision we’re interested in.

On Linux, that’s pretty easy to arrange with a bit of tcpdump and some good old awk:

#!/bin/bash
/usr/bin/nohup /usr/sbin/tcpdump -ln port 53 2>&1 | awk '/\.domain:/ { print $3; system("") }' | awk -F'.' '{ print $1"."$2"."$3"."$4; system("") }' > /tmp/dns_clients.log &

What does that do then?
It’s quite a long pipeline, so if we split it into chunks, it looks a bit like this:

/usr/bin/nohup

nohup combined with the ‘&’ at the end runs the whole pipeline in such a way that it doesn’t die when you log out. Which is useful if you want to set something running and then come back to it later.

/usr/sbin/tcpdump -ln port 53 2>&1

We then use tcpdump to dump all traffic on port 53 (DNS) The -n tells it to not resolve any IP addresses to dns names, and the -l changes the STDOUT buffering to be line buffered. This is helpful if you want to be able to see clients hitting your box in real time, for example to make sure the script is doing what you’re expecting it to.

“2>&1” merges STDERR and STDOUT into a single STDOUT stream.

awk '/\.domain:/ { print $3; system("") }'

Next we awk to look for lines which contain the string “.domain:” these are the ones which are headed towards our DNS server, rather than outbound requests made by processes running on the server. “print $3” prints the third field on the line (which is the source IP address/port of the request)

system(“”) is a useful bodge which makes the output from awk line buffered, in the same way as we used -l for tcpdump.

awk -F'.' '{ print $1"."$2"."$3"."$4; system("") }'

A bit more awk to strip off the port number, leaving us with just the IPv4 address. The observant amongst you will notice that this does nothing for IPv6 addresses. I should probably come up with a better solution, but this is sufficient for the boxes I’m currently interested in.

> /tmp/dns_clients.log &

redirects all the output into the /tmp/dns_clients.log file.

Handling the log file
So set that running on a DNS server, and client IP addresses will be logged to /tmp/dns_clients.log without logging what they’re looking at or slowing down the server too much. However, it logs one line for every request so it can get large quite quickly on a busy server.

I’ve been rotating that logfile out daily and running it through “sort -u” to get a list of unique clients. Once I’ve tracked them all down and pointed them at a more appropriate DNS server I’ll be able to retire the old ones.

Win!

Solaris Bonus Round
If you need to do this on solaris, tcpdump isn’t generally available (unless you’re willing to build it yourself) but /usr/sbin/snoop has roughly equivalent functionality. The output format is a little different, although it’s a bit easier to handle.

#!/usr/bin/bash
/usr/bin/nohup /usr/sbin/snoop -r dst port 53 | awk '{ print $1 }' > /tmp/dns_clients.log &

That does broadly the right thing. It includes traffic originated by the server as well as traffic hitting it from clients (so you could also pipe it through “grep -v $MY_IP” to weed that out if you wanted)

Nagios alerts via Google Talk

Every server built by my team in the last 3 years gets automatically added to our Nagios monitoring. We monitor the heck out of everything, and Nagios is configured to send us an alert email when something needs our attention.

Recently we experienced an issue with some servers which are used to authenticate a large volume of users on a high profile service, nagios spotted the issue and sent us an email – which was then delayed and didn’t actually hit our inboxes until 1.5hrs after the fault developed. That’s 1.5hrs of downtime on a service, in the middle of the day, because our alerting process failed us.

This is clearly Not Good Enough(tm) so we’re stepping it up a notch.

With help from David Gardner we’ve added Google Talk alerts to our Nagios instance. Now when something goes wrong, as well as getting an email about it, my instant messenger client goes “bong!” and starts flashing. Win!

If you squint at it in the right way, on a good day, Google Talk is pretty much Jabber or XMPP and that appears to be fairly easy to automate.

To do this, you need three things things:

  1. An account for Nagios to send the alerts from
  2. A script which sends the alerts
  3. Some Nagios config to tie it all together

XMPP Account

We created a free gmail.com account for this step. If you prefer, you could use another provider such as jabber.org. I would strongly recommend you don’t re-use any account you use for email or anything. Keep it self contained (and certainly don’t use your UoB gmail account!)

Once you’ve created that account, sign in to it and send an invite to the accounts you want the alerts to be sent to. This establishes a trust relationship between the accounts so the messages get through.

The Script

This is a modified version of a perl script David Gardner helped us out with. It uses the Net::XMPP perl module to send the messages. I prefer to install my perl modules via yum or apt (so that they get updated like everything else) but you can install it from CPAN if you prefer. Whatever floats your boat. On CentOS it’s the perl-Net-XMPP package, and on Debian/Ubuntu it’s libnet-xmpp-perl

#!/usr/bin/perl -T
use strict;
use warnings;
use Net::XMPP;
use Getopt::Std;

my %opts;
getopts('f:p:r:t:m:', \%opts);

my $from = $opts{f} or usage();
my $password = $opts{p} or usage();
my $resource = $opts{r} || "nagios";
my $recipients = $opts{t} or usage();
my $message = $opts{m} or usage();

unless ($from =~ m/(.*)@(.*)/gi) {
  usage();
}
my ($username, $componentname) = ($1,$2);

my $conn = Net::XMPP::Client->new;
my $status = $conn->Connect(
  hostname => 'talk.google.com',
  port => 443,
  componentname => $componentname,
  connectiontype => 'http',
  tls => 0,
  ssl => 1,
);

# Change hostname
my $sid = $conn->{SESSION}->{id};
$conn->{STREAM}->{SIDS}->{$sid}->{hostname} = $componentname;

die "Connection failed: $!" unless defined $status;
my ( $res, $msg ) = $conn->AuthSend(
  username => $username,
  password => $password,
  resource => $resource, # client name
);
die "Auth failed ", defined $msg ? $msg : '', " $!"
unless defined $res and $res eq 'ok';

foreach my $recipient (split(',', $recipients)) {
  $conn->MessageSend(
    to => $recipient,
    resource => $resource,
    subject => 'message via ' . $resource,
    type => 'chat',
    body => $message,
  );
}

sub usage {
print qq{
$0 - Usage

-f "from account" (eg nagios\@myhost.org)
-p password
-r resource (default is "nagios")
-t "to account" (comma separated list or people to send the message to)
-m "message"
};
exit;

The Nagios Config

You need to install the script in a place where Nagios can execute it. Usually the place where your Nagios check plugins are installed is fine – on our systems that’s /usr/lib64/nagios/plugins.

Now we need to make Nagios aware of this plugin by defining a command. In your command.cfg, add two blocks like this (one for service notifications, one for host notifications). Replace <username> with the gmail account you registered, excluding the suffix, and replace <password> with the account password.

define command {
  command_name notify-by-xmpp
  command_line $USER1$/notify_by_xmpp -f <username@gmail.com> -p <password> -t $CONTACTEMAIL$ -m "$NOTIFICATIONTYPE$ $HOSTNAME$ $SERVICEDESC$ $SERVICESTATE$ $SERVICEOUTPUT$ $LONGDATETIME$"
}

define command {
  command_name host-notify-by-xmpp
  command_line $USER1$/notify_by_xmpp -f <username@gmail.com> -p <password> -t $CONTACTEMAIL$ -m "Host $HOSTALIAS$ is $HOSTSTATE$ - Info"
}

This command uses the Nagios user’s registered email address for XMPP as well as email. For this to work you will probably have to use the short (non-aliased) version of the email address, i.e. ab12345@bristol.ac.uk rather than alpha.beta@bristol.ac.uk. Change this in contact.cfg if necessary.

With the script in place and registered with Nagios, we just need to tell Nagios to use it. You can enable it per-user or just enable it for everyone. In this example we’ll enable it for everyone.

Look in templates.cfg and edit the generic contact template to look like this. Relevant changes are in bold.

define contact{
        name                            generic-contact
        service_notification_period     24x7
        host_notification_period        24x7
        service_notification_options    w,c,r,f,s
        host_notification_options       d,u,r,f,s
        service_notification_commands   notify-service-by-email, notify-service-by-xmpp
        host_notification_commands      notify-host-by-email, notify-by-xmpp
        register                        0
}

Restart Nagios for the changes to take effect. Now break something, and wait for your IM client to receive the notification.
Lightning talks: the lizard brain of unix…

I’ve been spending some of my spare time recently trawling youtube looking for lightning talks from unix/devops conferences. Lightning talks have the advantage that you can skip through presenters or topics you’re not interested in, and from time to time you find a presenter or a topic which tickles you.

Top of my list this week is Bryan Cantrill (Used to work for Sun, now works for Joyent) presenting at Surge, which is described on the conference website as “Now in its fourth year, Surge has become the conference on scalability and performance engineering.”

Bryan clearly knows his stuff, and is a very entertaining speaker. Each of these talks is about 15 minutes long, but they’re at the end of each video.

Surge 2012: Two unix commands you’ve probably never heard of, and certainly don’t use
The sound is a bit ropey at the beginning of the 2012 talk, but gets better when he works out how to switch his mic on.

Surge 2013: “tail -f”

If you’ve got any other tips for videos of talks (lightning or otherwise) that you think I should watch, drop a link in the comments and I’ll add them to my playlist of “things to watch while I spend my evenings working on other things

Quicktip – mp4 playback in chromium

I use Ubuntu as my main desktop both at work and at home, and chromium as my default browser. For ages it’s been annoying me that some videos on youtube don’t play. Well, I’ve finally gotten around to fixing it.

It seems mp4 playback is missing from chromium on ubuntu, and can be added with:

sudo apt-get install chromium-codecs-ffmpeg-extra

Restart chromium and you can go back to watching kittens falling off tables.

eduroam in Freshers’ Week: Some graphs

This year, eduroam is an interesting service. Not only has it been running on all-new Fog-based infrastructure since the mid-summer, but eduroam and ResNet Wireless have been merged to form one authenticated wireless network to rule them all with more users than ever before.

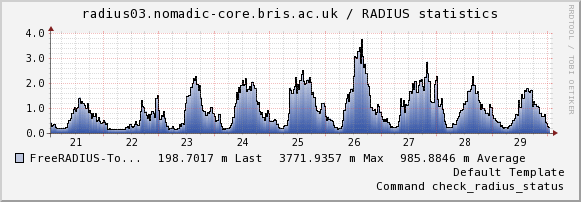
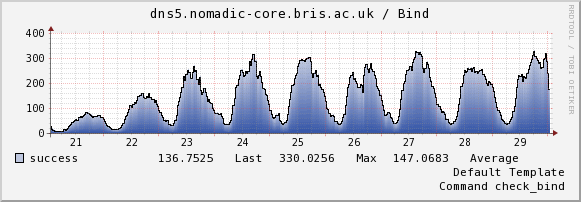
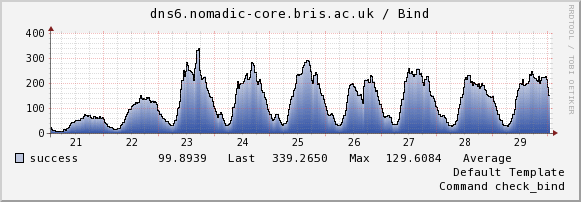
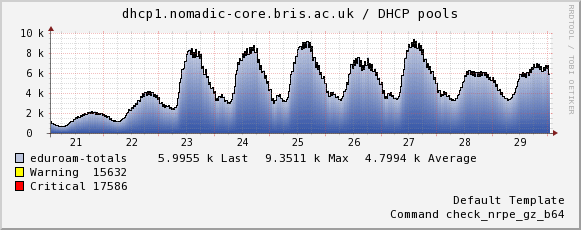
We’ve been watching how the servers are performing under load for the first time with great interest. Let’s have a look at some of the numbers. All of these graphs show the time from midnight on Saturday 21st September (UK freshers arrive) to midnight on Monday 30th September (end of weekend after freshers week).

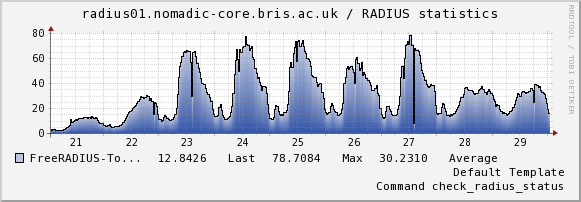
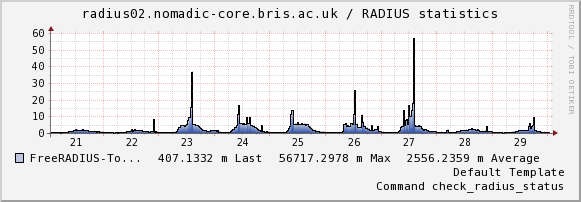
First let’s have a look at the graph of RADIUS authentication requests – scaled to show Access-Request packets received per second (not necessarily authentications per second, as one authentication usually constitutes several Access-Requests).

The gentle swell of users on the weekend of the 28th/29th is mostly undergraduates using eduroam in residences. The taller spikes on weekdays is made up by University staff using eduroam on campus.

radius01 usually serves eduroam users on campus, at Bristol – both Bristol students and visitors from other eduroam institutions. radius02 usually serves Bristol users who are visiting other institutions, while radius03 usually authenticates any user authenticating at eduroam hotspots in Bristol City Council buildings, and certain local hospitals. However the servers have got each other’s backs, and will take on additional roles at will if there’s an outage.

There are a couple of large spikes on the graph of radius02 with matching notches on the graph of radius01. These are times when the servers decided to shuffle around and radius02 temporarily became the primary for campus users, which is by far the largest set of users.

radius01-total-access-challenges
radius02-total-access-challenges
radius03-total-access-challenges

Now for DNS. Pretty self explanatory – these graphs for the two DNS servers show the number of successful queries per second. At peak, times, we serve over 600 lookups per second.

dns5-success dns6-success

This graph shows the number of valid IPv4 DHCP leases currently in the lease file. We don’t currently graph IPv6 leases so there’s no way of knowing how many there are. Adding this is on my to-do list 🙂

dhcp1-eduroam-totals

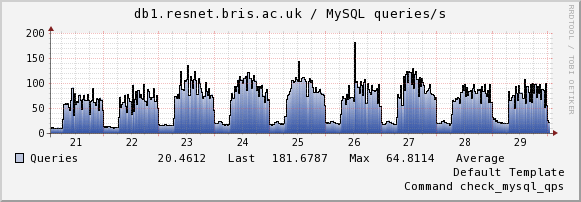
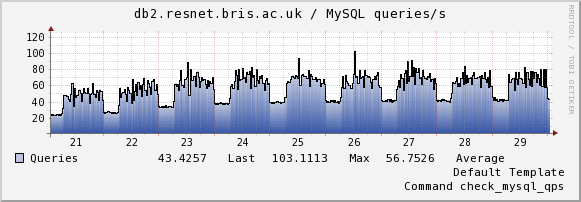
Last but not least, this graph shows the number of queries per second for both nodes in the MySQL cluster that powers eduroam, ResNet and related services. It’s used for authentications, logging and infrastructure management. The two nodes are in a cluster and can rearrange themselves at will, but at any one time, there is one master and one slave. By default db1 is usually the master and handles mostly INSERTs and UPDATEs while db2 is usually the slave and handles only SELECTs.

db1-qps db2-qps

More Juniper VPN Client…

As mentioned at the bottom of my previous post, it is possible to connect to the Juniper VPN without using the java gui, you just need the right command line arguments.

Well, I’ve worked out what those are.

./ncsvc -h uobnet.bris.ac.uk -f ./uobnet.crt -r UoB-Users -u ab12345

(replacing ab12345 with your UoB username obviously)

The list of 32bit dependencies is significantly smaller (as it doesn’t involve Java!) and on Ubuntu the client seems to be satisfied with:

sudo apt-get install libc6-i386 lib32z1 lib32nss-mdns

As before, the above has had very little testing at all.  Any reports of what it does on non-ubuntu systems would be very welcome indeed!

Making the Juniper VPN Client work…

As well as the 32bit rpm version of the Linux client, Juniper have a browser based Java applet for all OSes – which also works on Linux.

It’s not as pretty as the windows/mac client, but it can be made to work – and if you rummage around in it enough it contains a non-java executable at its core which may be useful as the basis of a homebrew non-java application.

Caveats:
This blog post describes a way to get connected to the new UoB vpn using a linux client.  It’s not tested enough, or foolproof enough to qualify as “official” documentation.  It’s more a record of “what I did to make it work”.

We’ve still got a fair way to go before we can publish any of this fully alongside the other instructions.

So try it, if it works for you great! Let us know in the comments!  If I’ve got something wrong, or you’ve worked around one of the problems I hit, let us know in the comments!

If it doesn’t work for you we’d like to hear about that too, but asking for help via the bris-linux mailing list or the IRC channel is probably going to be more productive than asking in the comments.

Ubuntu 12.04 and 12.10 (64bit)
The GUI for the vpn client is a 32bit Java application.  Ubuntu doesn’t appear to install java at all as part of the base install.  So if you’re starting from a point where you have no java support at all, it’s fairly straight forward:

 sudo apt-get install icedtea-7-plugin openjdk-7-jre:i386

The icedtea-7-plugin package will pull in the 64bit version of Java as a dependency, and the 64bit version is chosen by preference.  You can change this by running:

sudo update-alternatives --config java

And select the 32bit version from the list.

At this point, you’ve got 32bit java installed and selected as your default version of java.  You also have the icedtea java plugin for 64bit web browsers installed.

Now point your web browser at https://uobnet.bris.ac.uk and sign in using your UoB username and password.  When the page loads, you should see a line which says “Network Connect” – click the Start button.

You’ll probably get a popup warning saying that you need to make sure you’ve got all the required 32bit libraries installed.  You have (we’ve just done that!) so click “Yes”  – you’ll also get a couple of popups asking if you’re sure you trust the certificate the application was signed with

The first time you run Network Connect it will pop up a terminal window and ask you to put in your (local) sudo password.  This is because the underlying vpn widget needs to run as root, and this popup will setuid the binary so you don’t need to sudo every time you connect.

NetworkConnect

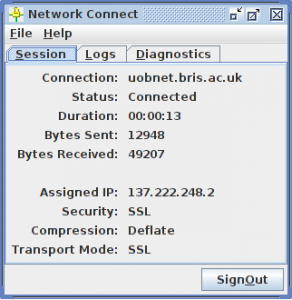
With a bit of luck and a following wind, you’ll get an ugly box pop up which says you’re connected!

Fedora/RedHat/CentOS/ScientificLinux
I haven’t tested any of these, but as far as I can tell, doing this would probably work:

sudo yum install java-1.7.0-openjdk.i386 icedtea-web.i386

Then follow the rest of the Ubuntu instructions

I don’t want Java in my Browser!
Neither do I to be honest. I have the plugin disabled most of the time and enable it only when I want to connect to the VPN.

The version of the client which Juniper distribute as an rpm appears to be a packaged version of the java client which you can load from the browser as described above.

As yet, I’ve not had a chance to do any testing of the rpm version.  Details of that will follow in later posts…

I don’t want Java at all!
As far as I can tell, Java is only required for the GUI. It’s a wrapper around a 32bit binary executable which could be called from the command line (or wrapped in a non-java GUI or script I suppose)

I haven’t managed to find the right magic incantation to get it to actually build a VPN tunnel yet, but this is where I’ve got to so far:

  1. Download the java applet by going to https://uobnet.bris.ac.uk/dana-cached/nc/ncLinuxApp.jar If it asks you to log in, do so using your UoB username and password
  2. Unpack the archive with
    unzip ncLinuxApp.jar
  3. That should give you a folder full of files, which we need to go into:
    cd ncLinuxApp
  4. There’s a helper script we need to run first, which grabs the SSL certificate in use by the VPN connection.  Run it like this:
    bash ./getx509certificate.sh uobnet.bris.ac.uk uobnet.crt
  5. The binary which actually builds the tunnel is “ncsvc” which is a 32bit executable.  It appears to require 3 packages on Ubuntu:
    sudo apt-get install libc6-i386 lib32z1 lib32nss-mdns

However, at that point I’m stuck.  It looks very much like you should be able to build a tunnel by making ncsvc setuid and then calling it with the appropriate parameters:

sudo chown root ncsvc
sudo chmod +s ncsvc
...

Unfortunately I can’t make it work

I’ve made it work!  See this followup blog post for details.

I don’t like closed source binaries either..
As Ian has mentioned previously, We’ve not managed to get the network-manager-vpnc client to connect at all.  We’ll probably come back to that after prodding at rpms, but in the mean time, if you manage to make it work please let us know!

Further Reading
Most of the above is information culled from the following links.  They may be helpful if you fancy having a prod at this yourself.

Some of those links contain perl script wrappers for ncsvc, but as I’ve not had a chance to read every line of that code to make sure it’s not malicious in any way I really can’t recommend you use them!

Linux and the UoB VPN

The University of Bristol has had a VPN service for at least 11 years now, and although the hardware has had a few upgrades in that time the service is essentially running in the same form, using the same old technology.

Time has moved on, and the old VPN service needs replacing so that we can bring its support level up to where we want it.

We’ve procured a VPN appliance from Juniper, and this meets the needs of the majority of Windows, OSX, iPhone and Android users (and meets those needs much better than the old service ever has done.)

Unfortunately there are a few “wrinkles” in Juniper’s Linux client support.

Juniper Client
Juniper do distribute a Linux client.  It’s packaged as an RPM suitable for RedHat Enterprise (or derivatives such as CentOS or Scientific Linux) and is 32bit only. Which is fine, if that’s what you’re using!

If you’re using a Debian derived distribution (Debian, Ubuntu, Mint etc) or a 64bit OS, then it’s not so great.

Various workarounds which will get that 32bit RPM installed on a 64bit Ubuntu (or whatever) seem to be available according to google, but we’ve not had the resources available through the summer to test or document them. Work is now tenatively beginning…

Network Manager

Most linux distributions come with Network Manager these days, and on most of those distributions you can get the “network-manager-vpnc” plugin, which claims to be “compatible with various Cisco, Juniper, Netscreen, and Sonicwall IPSec-based VPN gateways”.

This would seem to be the ideal solution (as it’s built in, doesn’t have any 32 bit dependencies etc) unfortunately we haven’t managed to make it work yet. Discussions with Juniper suggest that this may be caused by a bug in the way they talk to our AD, with a possible fix coming out later in the year, but this is yet to be proven.

That’s not great either, so we need some coping strategies…

Plans B, C, etc…
In the short term, we’re going to keep the old VPN service around so that linux clients still have a way to connect in remotely until we can come up with something better.

We would welcome you to try getting the 32-bit client installed on the distribution of your choice. If anyone makes any progress with that before we’ve had a chance to, please let us know!  Any testing we do will initially result in more blog posts here, and eventually some proper documentation (and hopefully some wrapper scripts/installers if we can get that working)

In the longer-term, we’d obviously like Juniper to release 64bit binary packages (and .debs!) We’re in contact with Juniper about their roadmap and release cycle and will be re-evaluating all of the above options as & when more information becomes available…

** STOP PRESS ** We have managed to make a 64bit Ubuntu machine successfully connect to the VPN. Details will be in a follow-up post.